Attaching Custom Attributes To Cells
Cells in CompuCell3D are represented by the CellG class. The class is defined in CompuCell3D/core/CompuCell3D/Potts3D/Cell.h:
#ifndef CELL_H
#define CELL_H


#ifndef PyObject_HEAD
struct _object; //forward declare
typedef _object PyObject; //type redefinition
#endif

class BasicClassGroup;

namespace CompuCell3D {

  /**
   * A Potts3D cell.
   */

   class CellG{
   public:
      typedef unsigned char CellType_t;
      CellG():
        volume(0),
        targetVolume(0.0),
        lambdaVolume(0.0),
        surface(0),
        targetSurface(0.0),
        lambdaSurface(0.0),
        clusterSurface(0.0),
        targetClusterSurface(0.0),
        lambdaClusterSurface(0.0),
        type(0),
        xCM(0),yCM(0),zCM(0),
        xCOM(0),yCOM(0),zCOM(0),
        xCOMPrev(0),yCOMPrev(0),zCOMPrev(0),
        iXX(0), iXY(0), iXZ(0), iYY(0), iYZ(0), iZZ(0),
        lX(0.0),
        lY(0.0),
        lZ(0.0),
        lambdaVecX(0.0),
        lambdaVecY(0.0),
        lambdaVecZ(0.0),
        flag(0),
        id(0),
        clusterId(0),
        fluctAmpl(-1.0),
        lambdaMotility(0.0),
        biasVecX(0.0),
        biasVecY(0.0),
        biasVecZ(0.0),
        connectivityOn(false),
        extraAttribPtr(0),
        pyAttrib(0)


      {}
      long volume;
      float targetVolume;
      float lambdaVolume;
      double surface;
      float targetSurface;
      float angle;
      float lambdaSurface;
      double clusterSurface;
      float targetClusterSurface;
      float lambdaClusterSurface;
      unsigned char type;
      unsigned char subtype;
      double xCM,yCM,zCM; // numerator of center of mass expression (components)
      double xCOM,yCOM,zCOM; // numerator of center of mass expression (components)
      double xCOMPrev,yCOMPrev,zCOMPrev; // previous center of mass
      double iXX, iXY, iXZ, iYY, iYZ, iZZ; // tensor of inertia components
      float lX,lY,lZ; //orientation vector components - set by MomentsOfInertia Plugin - read only
      float ecc; // cell eccentricity
      float lambdaVecX,lambdaVecY,lambdaVecZ; // external potential lambda vector components
      unsigned char flag;
      float averageConcentration;
      long id;
      long clusterId;
      double fluctAmpl;
      double lambdaMotility;
      double biasVecX;
      double biasVecY;
      double biasVecZ;
      bool connectivityOn;
      BasicClassGroup *extraAttribPtr;

      PyObject *pyAttrib;
   };


  class Cell {
  };

  class CellPtr{
   public:
   Cell * cellPtr;
  };
};
#endif
CellG already contains many standard attributes, but simulations often need additional per-cell data. For example, you may want to store the last 50 center-of-mass positions for each cell so that you can plot recent trajectories.
One possible approach is to add a member such as std::queue directly to CellG. That works technically, but it is usually the wrong extension point: CellG is a core class used by nearly every CC3D module, so changing it forces a broad core rebuild and makes your code harder to share.
In Python, adding cell-specific data is simple:
cell.dict['cell_x_positions'] = [0.0]*50
cell.dict['cell_y_positions'] = [0.0]*50
cell.dict['cell_z_positions'] = [0.0]*50
Here, we added 3 attributes each one representing last 50 positions x, y, or z coordinates of center of mass. We
initialized them to be 0.0 hence the code [0.0]*50. In Python when you multiply list by an integer it will return
a list that is contains multiple copies of the list you originally multiplied (in our case we will get a list
with 50 zeros).
The Python approach is convenient and often sufficient. When the data must remain in C++ for performance or integration reasons, use CC3D’s extra-member accessor mechanism. It attaches an instance of your own C++ class to each cell without modifying CellG itself.
Constructing A Steppable With A Custom Per-Cell Class
Begin in Twedit++ by choosing CC3D C++ -> Generate New Module.... Create a DeveloperZone steppable named CustomCellAttributeSteppable and check Attach Cell Attribute. This tells Twedit++ to generate the code that registers a custom C++ data object with the CC3D cell factory.
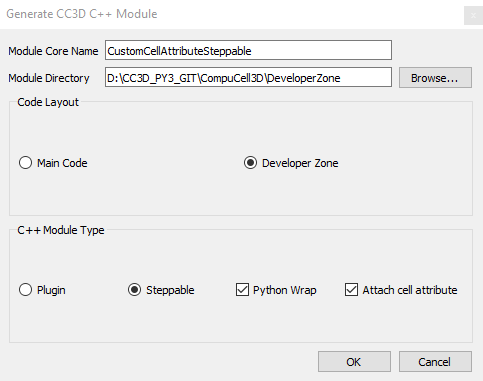
We press OK button and the steppables code with additional attribute
will get generated and the code will open in Twedit++ tabs:
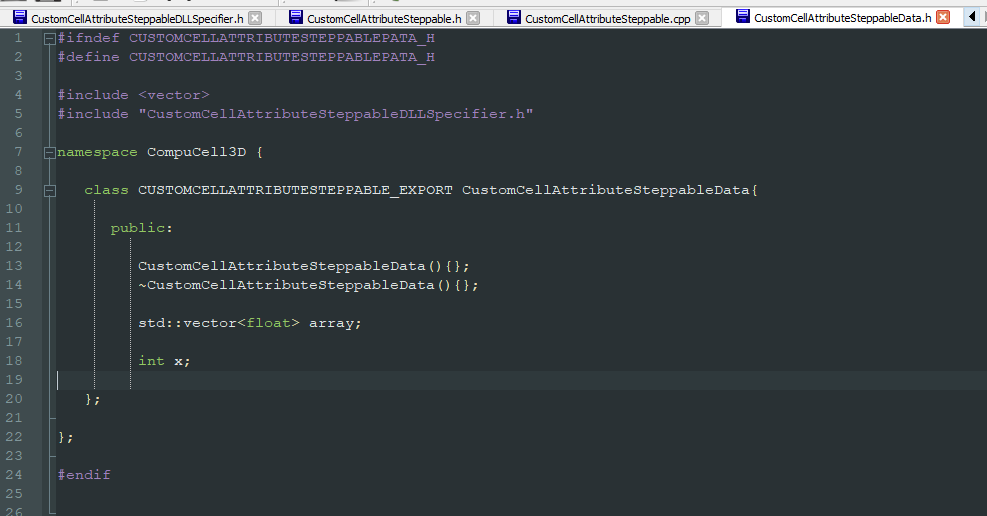
The generated data class is the object that will be attached to each cell. Once the steppable is loaded and initialized, CC3D creates one CustomCellAttributeSteppableData object per cell.
#ifndef CUSTOMCELLATTRIBUTESTEPPABLEPATA_H
#define CUSTOMCELLATTRIBUTESTEPPABLEPATA_H

#include <vector>
#include "CustomCellAttributeSteppableDLLSpecifier.h"

namespace CompuCell3D {

   class CUSTOMCELLATTRIBUTESTEPPABLE_EXPORT CustomCellAttributeSteppableData{

      public:

         CustomCellAttributeSteppableData(){};
         ~CustomCellAttributeSteppableData(){};

         std::vector<float> array;

         int x;

   };

};

#endif
If we look into CustomCellAttributeSteppable init function (this function is called during steppable
initialization) we can see a line potts->getCellFactoryGroupPtr()->registerClass(&customCellAttributeSteppableDataAccessor);
This line is responsible for telling cell factory object that each new cell should have an object of type
CustomCellAttributeSteppableData attached.
void CustomCellAttributeSteppable::init(Simulator *simulator, CC3DXMLElement *_xmlData) {

  xmlData=_xmlData;

  potts = simulator->getPotts();

  cellInventoryPtr=& potts->getCellInventory();

  sim=simulator;

  cellFieldG = (WatchableField3D<CellG *> *)potts->getCellFieldG();

  fieldDim=cellFieldG->getDim();

  ExtraMembersGroupAccessorBase *accessorPtr = &customCellAttributeSteppableDataAccessor;
  potts->getCellFactoryGroupPtr()->registerClass(accessorPtr);

  simulator->registerSteerableObject(this);

  update(_xmlData,true);

}
The steppable header identifies the attached data type through this accessor member: ExtraMembersGroupAccessor<CustomCellAttributeSteppableData> customCellAttributeSteppableDataAccessor;.
This line creates an accessor object. Given a cell pointer, the accessor fetches the attached object of
type CustomCellAttributeSteppableData. The exact details of how this is done are beyond the scope of this
manual but if you follow the pattern you will be able to attach arbitrary C++ objects to cc3d cells.
The pattern is:
1. Add ExtraMembersGroupAccessor member to your module - steppable or a plugin - ExtraMembersGroupAccessor<ClassYouWantToAttach>.
In our case we add ExtraMembersGroupAccessor<CustomCellAttributeSteppableData> customCellAttributeSteppableDataAccessor;.
2. Add a function that accesses a pointer to this ExtraMembersGroupAccessor member - in our case we add (see code below)
ExtraMembersGroupAccessor<CustomCellAttributeSteppableData> * getCustomCellAttributeSteppableDataAccessorPtr(){return & customCellAttributeSteppableDataAccessor;}
3. Register ExtraMembersGroupAccessor object with cell factory (we do it in the init function) of the steppable or plugin -
see full init function above:
potts->getCellFactoryGroupPtr()->registerClass(&customCellAttributeSteppableDataAccessor);
#ifndef CUSTOMCELLATTRIBUTESTEPPABLESTEPPABLE_H
#define CUSTOMCELLATTRIBUTESTEPPABLESTEPPABLE_H
#include <CompuCell3D/CC3D.h>
#include "CustomCellAttributeSteppableData.h"
#include "CustomCellAttributeSteppableDLLSpecifier.h"

namespace CompuCell3D {

  template <class T> class Field3D;
  template <class T> class WatchableField3D;

    class Potts3D;
    class Automaton;
    class BoundaryStrategy;
    class CellInventory;
    class CellG;

  class CUSTOMCELLATTRIBUTESTEPPABLE_EXPORT CustomCellAttributeSteppable : public Steppable {

    ExtraMembersGroupAccessor<CustomCellAttributeSteppableData> customCellAttributeSteppableDataAccessor;

    WatchableField3D<CellG *> *cellFieldG;

    Simulator * sim;

    Potts3D *potts;

    CC3DXMLElement *xmlData;

    Automaton *automaton;

    BoundaryStrategy *boundaryStrategy;

    CellInventory * cellInventoryPtr;

    Dim3D fieldDim;

  public:

    CustomCellAttributeSteppable ();

    virtual ~CustomCellAttributeSteppable ();

    // SimObject interface

    virtual void init(Simulator *simulator, CC3DXMLElement *_xmlData=0);

    virtual void extraInit(Simulator *simulator);

    ExtraMembersGroupAccessor<CustomCellAttributeSteppableData> * getCustomCellAttributeSteppableDataAccessorPtr(){return & customCellAttributeSteppableDataAccessor;}

    //steppable interface

    virtual void start();

    virtual void step(const unsigned int currentStep);

    virtual void finish() {}


    //SteerableObject interface

    virtual void update(CC3DXMLElement *_xmlData, bool _fullInitFlag=false);

    virtual std::string steerableName();

    virtual std::string toString();


  };

};

#endif
Now that the registration pattern is clear, we can use the attached data. This example does not need XML parameters, so we will simplify update and then modify step to store two values in each cell’s CustomCellAttributeSteppableData object: the product of cell id and current MCS in x, and the last five x-coordinates of the cell center of mass.
Here is implementation of the update function where we remove XML parsing code since we are not doing
any XML parsing in this particular case:
void CustomCellAttributeSteppable::update(CC3DXMLElement *_xmlData, bool _fullInitFlag) {


    //PARSE XML IN THIS FUNCTION

    //For more information on XML parser function please see CC3D code or lookup XML utils API

    automaton = potts->getAutomaton();

    ASSERT_OR_THROW("CELL TYPE PLUGIN WAS NOT PROPERLY INITIALIZED YET. MAKE SURE THIS IS THE FIRST PLUGIN THAT YOU SET", automaton)


        //boundaryStrategy has information about pixel neighbors
        boundaryStrategy = BoundaryStrategy::getInstance();

}
The implementation of step function is a bit more involved but not by much:
 1void CustomCellAttributeSteppable::step(const unsigned int currentStep) {
 2
 3    CellInventory::cellInventoryIterator cInvItr;
 4
 5    CellG * cell = 0;
 6
 7    for (cInvItr = cellInventoryPtr->cellInventoryBegin(); cInvItr != cellInventoryPtr->cellInventoryEnd(); ++cInvItr)
 8
 9    {
10
11        cell = cellInventoryPtr->getCell(cInvItr);
12
13        CustomCellAttributeSteppableData * customCellAttrData = customCellAttributeSteppableDataAccessor.get(cell->extraAttribPtr);
14
15        //storing cell id multiplied by currentStep in "x" member of the CustomCellAttributeSteppableData
16        customCellAttrData->x = cell->id * currentStep;
17
18
19
20        // storing last 5 xCOM positions in the "array" vector (part of  CustomCellAttributeSteppableData)
21        std::vector<float> & vec = customCellAttrData->array;
22        if (vec.size() < 5) {
23            vec.push_back(cell->xCOM);
24        }
25        else
26        {
27            for (int i = 0; i < 4; ++i) {
28                vec[i] = vec[i + 1];
29            }
30            vec[vec.size() - 1] = cell->xCOM;
31        }
32
33    }
34
35    //printouts
36    for (cInvItr = cellInventoryPtr->cellInventoryBegin(); cInvItr != cellInventoryPtr->cellInventoryEnd(); ++cInvItr) {
37        cell = cellInventoryPtr->getCell(cInvItr);
38        CustomCellAttributeSteppableData * customCellAttrData = customCellAttributeSteppableDataAccessor.get(cell->extraAttribPtr);
39
40        cerr << "cell->id=" << cell->id << " mcs = " << currentStep << " attached x variable = " << customCellAttrData->x << endl;
41
42        cerr << "----------- up to last 5 xCOM positions ----- for cell->id " << cell->id << endl;
43        for (int i = 0; i < customCellAttrData->array.size(); ++i) {
44            cerr << "x_com_pos[" << i << "]=" << customCellAttrData->array[i] << endl;
45        }
46    }
47
48}
Lines 7-11 should be familiar. We iterate over all cells in the simulation and fetch a cell pointer from
inventory and store it in local variable cell.
In line 13 we make use of our accessor object. Here we are actually fetching object of type
CustomCellAttributeSteppableData that is attached to each cell. Note that
customCellAttributeSteppableDataAccessor.get function takes as an input special pointer that is a member of
every cell object cell->extraAttribPtr and returns a pointer to the object that accessor is associated with
in our case it returns a pointer to CustomCellAttributeSteppableData.
In line 16 we assign x variable of the object of class CustomCellAttributeSteppableData to be a product
of current cell id and current MCS.
In lines 21-33 we append current xCOM position of current cell to the vector array. We only keep
last 5 positions and therefore in the else portion lines 25-31 we last 4 positions of the vector to the
“front” of the vector and write xCOM in the last position of the vector - line 30. Note that the else part
gets executed only if we determine that vector has already 5 elements. As you can see our attached attribute can store
variable number of elements - because we append to vector. In general we can have vectors, lists, maps, queues
of arbitrary objects. In fact instead of using std::vector it would be better to use queue because queue container
makes it much easier to remove and add elements to and from the beginning and end of the container.
Warning
One thing to remember that computer has a finite memory and it you keep appending you may actually exhaust all operating system memory.
Note
Unlike in Python where we can store arbitrary objects in the list or dictionary, in C++ we need to declare which types we want to store. It makes C++ less flexible but you recoup this minor inflexibility in much faster speed of code execution
The full code for this example can be found in CompuCell3D/DeveloperZone/Demos/CustomCellAttributesCpp directory
Using Python To Modify Custom C++ Attributes
Sometimes you want the same attached C++ data to be visible from Python. This is useful when C++ maintains the data efficiently, but Python steppables need to inspect or adjust selected values. If all we want to do is to access x
variable from CustomCellAttributeSteppableData we should be “pre-wired”. Well, almost. You see that when we
access objects of CustomCellAttributeSteppableData class from within C++ steppable where we declared the accessor
object we simply type:
CustomCellAttributeSteppableData * customCellAttrData = customCellAttributeSteppableDataAccessor.get(cell->extraAttribPtr)
However, note that customCellAttributeSteppableDataAccessor is declared in the “private” section of
CustomCellAttributeSteppable. Therefore, it is not “visible” from outside the C++ CustomCellAttributeSteppable
class. At this point we have three potential solutions:
Make the accessor public - not ideal , this is a low-level object that should remain hidden
2. Make a public function that returns a pointer to accessor - again, not ideal because then in Python or in other
C++ module we would need to perform a fairly complex fetching of the CustomCellAttributeSteppableData
3. Declare a public function that takes a pointer to a cell object and returns attached CustomCellAttributeSteppableData
object. This solution seems like the cleanest of all three options
Let’s modify a code and add the function that returns pointer to CustomCellAttributeSteppableData object. We first
modify header file for the steppable class:
class CUSTOMCELLATTRIBUTESTEPPABLE_EXPORT CustomCellAttributeSteppable : public Steppable {

   ExtraMembersGroupAccessor<CustomCellAttributeSteppableData> customCellAttributeSteppableDataAccessor;

  WatchableField3D<CellG *> *cellFieldG;

  Simulator * sim;

  // ... we skipped part of the code here for brevity
public:

  CustomCellAttributeSteppable ();

  virtual ~CustomCellAttributeSteppable ();

  // SimObject interface

  virtual void init(Simulator *simulator, CC3DXMLElement *_xmlData=0);

  virtual void extraInit(Simulator *simulator);

   ExtraMembersGroupAccessor<CustomCellAttributeSteppableData> * getCustomCellAttributeSteppableDataAccessorPtr(){return & customCellAttributeSteppableDataAccessor;}

  CustomCellAttributeSteppableData * getCustomCellAttribute(CellG * cell);

  // ... we skipped part of the code here for brevity

  };
Now, we add implementation of the getCustomCellAttribute function to implementation file
CustomCellAttributeSteppableData * CustomCellAttributeSteppable::getCustomCellAttribute(CellG * cell) {

    CustomCellAttributeSteppableData * customCellAttrData = customCellAttributeSteppableDataAccessor.get(cell->extraAttribPtr);
    return customCellAttrData;
}
Note
Each time you modify header file for a C++ class that you are wrapping in Python . Make sure you also “refresh” SWIG .i file. It can be as simple as adding extra empty line to CompuCell3D\DeveloperZone\pyinterface\CompuCellExtraModules\CompuCellExtraModules.i
At this point we should be able access CustomCellAttributeSteppableData objects from “the outside” of the steppable
class. Let us now add Python steppable where we can access CustomCellAttributeSteppable and
CustomCellAttributeSteppableData:
 1from cc3d.core.PySteppables import *
 2from cc3d.cpp import CompuCellExtraModules
 3
 4
 5class CustomCellAttributePythonSteppable(SteppableBasePy):
 6
 7    def __init__(self, frequency=1):
 8        SteppableBasePy.__init__(self, frequency)
 9        self.custom_attr_steppable_cpp = None
10
11    def start(self):
12        self.custom_attr_steppable_cpp = CompuCellExtraModules.getCustomCellAttributeSteppable()
13
14    def step(self, mcs):
15
16        print ('mcs=', mcs)
17
18        for cell in self.cell_list:
19            custom_cell_attr_data = self.custom_attr_steppable_cpp.getCustomCellAttribute(cell)
20            print('custom_cell_attr_data=', custom_cell_attr_data)
21            print('custom_cell_attr_data.x=', custom_cell_attr_data.x)
22            custom_cell_attr_data.x = cell.id * mcs ** 2
23
24            print('after modification custom_cell_attr_data.x=', custom_cell_attr_data.x)
25            break
In line 12 we get access to C++ steppable object and store it in it a class variable
self.custom_attr_steppable_cpp. In case you are wondering where getCustomCellAttributeSteppable() comes
from, look into CompuCell3D\DeveloperZone\pyinterface\CompuCellExtraModules\CompuCellExtraModules.i. This SWIG
wrapper file declares this function and it returns C++ steppable object. This function is generated automatically
by Twedit++:
%inline %{

 CustomCellAttributeSteppable * getCustomCellAttributeSteppable(){

      return (CustomCellAttributeSteppable *)Simulator::steppableManager.get("CustomCellAttributeSteppable");

   }
Returning to our Python code we see that inside for loop we print to the screen the
CustomCellAttributeSteppableData object (line 20) and also print x member of this object. Later we
modify and print to the screen the x variable of the object and we only do it for the first cell we encounter
during iteration over all cells to make output more concise (see break statement at the end of the loop)
The output looks encouraging:
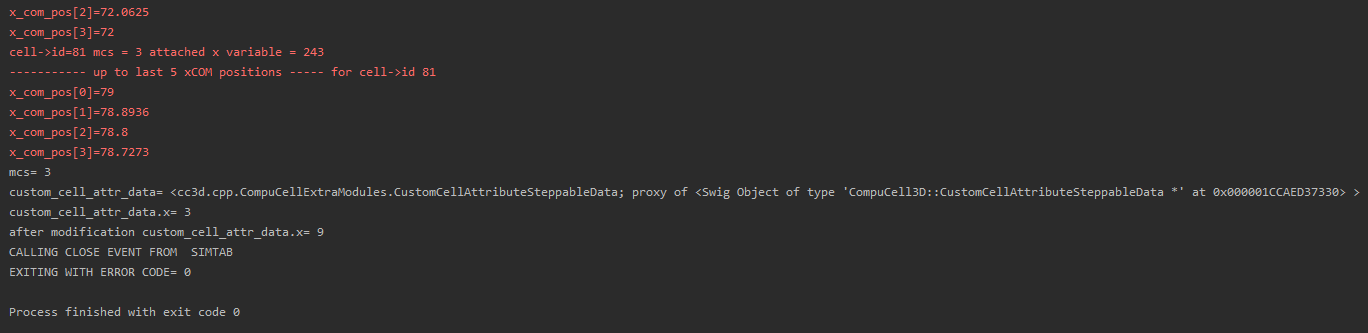
We can see - look at the lines:
custom_cell_attr_data.x= 3
after modification custom_cell_attr_data.x= 9
that we can access and modify x variable of the CustomCellAttributeSteppableData object that is
attached to each cell.
What about the array member of CustomCellAttributeSteppableData. Remember, in C++ it is of type
std::vector<float>. Can we access it? Can we modify it? Let’s us try:
 1from cc3d.core.PySteppables import *
 2from cc3d.cpp import CompuCellExtraModules
 3
 4
 5class CustomCellAttributePythonSteppable(SteppableBasePy):
 6
 7    def __init__(self, frequency=1):
 8        SteppableBasePy.__init__(self, frequency)
 9        self.custom_attr_steppable_cpp = None
10
11    def start(self):
12        self.custom_attr_steppable_cpp = CompuCellExtraModules.getCustomCellAttributeSteppable()
13
14    def step(self, mcs):
15        print('mcs=', mcs)
16
17        for cell in self.cell_list:
18            custom_cell_attr_data = self.custom_attr_steppable_cpp.getCustomCellAttribute(cell)
19            print('custom_cell_attr_data=', custom_cell_attr_data)
20            print('custom_cell_attr_data.x=', custom_cell_attr_data.x)
21
22            custom_cell_attr_data.x = cell.id * mcs ** 2
23
24            print('after modification custom_cell_attr_data.x=', custom_cell_attr_data.x)
25
26            print('custom_cell_attr_data.array=', custom_cell_attr_data.array)
27            print('custom_cell_attr_data.array[0]=', custom_cell_attr_data.array[0])
28
29            if len(custom_cell_attr_data.array) < 5:
30                custom_cell_attr_data.array.push_back(100.0)
31            print('custom_cell_attr_data.array[len(custom_cell_attr_data.array)-1] = ',
32                custom_cell_attr_data.array[len(custom_cell_attr_data.array)-1])
33
34            break
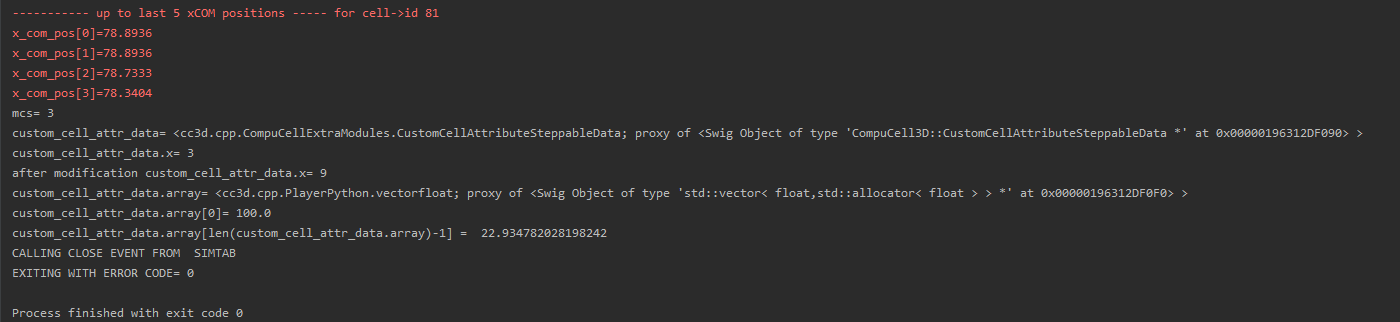
In lines 26-27 we print the type of custom_cell_attr_data.array as well as the first element.
Later, in lines 29-32 we are appending elements to the vector using push_back C++ function (because array
is a C++ object wrapped in Python). Notice that we are doing double append for first cell. First append
(push_back) happens in C++ and in Python we are doing a second one. This , somewhat artificial example shows
how to access and modify custom attributes from C++ and from Python in a single simulation.
Here is the output:
Adding A Complex Attached Attribute Type And Accessing It From Python
So far simple values worked well. We were able to access simple type variables (x), STL vectors array. So,
perhaps we can try adding something more complex to the CustomCellAttributeSteppableData, for example
let us add std::map<long int, std::vector<int> > which is C++ dictionary (map) that uses long integers as
keys and stores vectors of type integer:
#ifndef CUSTOMCELLATTRIBUTESTEPPABLEPATA_H
#define CUSTOMCELLATTRIBUTESTEPPABLEPATA_H

#include <vector>
#include "CustomCellAttributeSteppableDLLSpecifier.h"

namespace CompuCell3D {

   class CUSTOMCELLATTRIBUTESTEPPABLE_EXPORT CustomCellAttributeSteppableData{

      public:

         CustomCellAttributeSteppableData(){};
         ~CustomCellAttributeSteppableData(){};

         std::vector<float> array;
         std::map<long int, std::vector<int> > simple_map;

         int x;

   };

};

#endif
After we recompile (remember to refresh CompuCellExtraModules.i) and try running the following Python code:
 1from cc3d.core.PySteppables import *
 2from cc3d.cpp import CompuCellExtraModules
 3
 4
 5class CustomCellAttributePythonSteppable(SteppableBasePy):
 6
 7    def __init__(self, frequency=1):
 8        SteppableBasePy.__init__(self, frequency)
 9        self.custom_attr_steppable_cpp = None
10
11    def start(self):
12        self.custom_attr_steppable_cpp = CompuCellExtraModules.getCustomCellAttributeSteppable()
13
14    def step(self, mcs):
15        print('mcs=', mcs)
16
17        for cell in self.cell_list:
18            custom_cell_attr_data = self.custom_attr_steppable_cpp.getCustomCellAttribute(cell)
19            print('custom_cell_attr_data=', custom_cell_attr_data)
20            print('custom_cell_attr_data.x=', custom_cell_attr_data.x)
21
22            custom_cell_attr_data.x = cell.id * mcs ** 2
23
24            print('after modification custom_cell_attr_data.x=', custom_cell_attr_data.x)
25
26            print('custom_cell_attr_data.array=', custom_cell_attr_data.array)
27            print('custom_cell_attr_data.array[0]=', custom_cell_attr_data.array[0])
28
29            if len(custom_cell_attr_data.array) < 5:
30                custom_cell_attr_data.array.push_back(100.0)
31            print('custom_cell_attr_data.array[len(custom_cell_attr_data.array)-1] = ',
32                custom_cell_attr_data.array[len(custom_cell_attr_data.array)-1])
33
34            simple_map = custom_cell_attr_data.simple_map
35
36            print('simple_map.size()=', simple_map.size())
we will get an error when we try to get number of elements stored in the map (should be 0):
Traceback (most recent call last):
  File "D:\CC3D_PY3_GIT\cc3d\CompuCellSetup\sim_runner.py", line 77, in run_cc3d_project
    exec(code, globals(), locals())
  File "D:\CC3D_PY3_GIT\CompuCell3D\DeveloperZone\Demos\CustomCellAttributesPython\Simulation\CustomCellAttributesPython.py", line 6, in <module>
    CompuCellSetup.run()
  File "D:\CC3D_PY3_GIT\cc3d\CompuCellSetup\simulation_setup.py", line 117, in run
    main_loop_fcn(simulator, simthread=simthread, steppable_registry=steppable_registry)
  File "D:\CC3D_PY3_GIT\cc3d\CompuCellSetup\simulation_setup.py", line 583, in main_loop_player
    steppable_registry.step(cur_step)
  File "D:\CC3D_PY3_GIT\cc3d\core\SteppableRegistry.py", line 169, in step
    steppable.step(_mcs)
  File "D:\CC3D_PY3_GIT\CompuCell3D\DeveloperZone\Demos\CustomCellAttributesPython\Simulation\CustomCellAttributesPythonModules.py", line 36, in step
    print('simple_map.size()=', simple_map.size())
AttributeError: 'SwigPyObject' object has no attribute 'size'
Why the error? Simply put we did not tell SWIG about the complex types we are using for member simple_map.
You may ask how come before when we had std::vector<int> array; things worked. They worked because elsewhere
in the CompuCell3D main Python wrapper we told SWIG about template std::vector<int>. However now that we are
dealing with std::map<long int, std::vector<int> > simple_map; we need to tell SWIG how to make those object
available. It is actually quite easy to do. We add the following lines to CompuCellExtraModules.i:
%template (vector_int) std::vector<int>;
%template (map_long_vector_int)std::map<long int, std::vector<int> >;
For each template we are using in the our extra attribute we give it a name (e.g. vector_int) and list its
type - %template (vector_int) std::vector<int>;
After this fix when we try to run the earlier Python code we would get the following output:

As we can see the size of the map comes up as zero because we did not put any elements in it. Let’s add a code that puts something in the map:
 1from cc3d.core.PySteppables import *
 2from cc3d.cpp import CompuCellExtraModules
 3
 4
 5class CustomCellAttributePythonSteppable(SteppableBasePy):
 6
 7    def __init__(self, frequency=1):
 8        SteppableBasePy.__init__(self, frequency)
 9        self.custom_attr_steppable_cpp = None
10
11    def start(self):
12        self.custom_attr_steppable_cpp = CompuCellExtraModules.getCustomCellAttributeSteppable()
13
14    def step(self, mcs):
15        print('mcs=', mcs)
16
17        for cell in self.cell_list:
18            custom_cell_attr_data = self.custom_attr_steppable_cpp.getCustomCellAttribute(cell)
19            print('custom_cell_attr_data=', custom_cell_attr_data)
20            print('custom_cell_attr_data.x=', custom_cell_attr_data.x)
21
22            custom_cell_attr_data.x = cell.id * mcs ** 2
23
24            print('after modification custom_cell_attr_data.x=', custom_cell_attr_data.x)
25
26            print('custom_cell_attr_data.array=', custom_cell_attr_data.array)
27            print('custom_cell_attr_data.array[0]=', custom_cell_attr_data.array[0])
28
29            if len(custom_cell_attr_data.array) < 5:
30                custom_cell_attr_data.array.push_back(100.0)
31            print('custom_cell_attr_data.array[len(custom_cell_attr_data.array)-1] = ',
32                  custom_cell_attr_data.array[len(custom_cell_attr_data.array) - 1])
33
34            simple_map = custom_cell_attr_data.simple_map
35
36            print('simple_map.size()=', simple_map.size())
37            vec = CompuCellExtraModules.vector_int()
38            vec.push_back(20)
39            vec.push_back(30)
40            simple_map[cell.id] = vec
41
42            print('simple_map[cell.id]=', simple_map[cell.id])
43
44            break
In line 37 we create a C++ vector of integers using `` CompuCellExtraModules.vector_int()`` call.
Remember, vector_int is precisely template identifier we added in SWIG CompuCellExtraModules.i file.
Now we are simply invoking constructor for this type. In the next two lines 38-39 we push back two integers
to the newly created vector and finally in line 40 we store this vector in the map that is part of the object
that is attached to a cell. To check if we can retrieve the stored vector we use code from line 42. The output
is as follows:

Custom Cell Attribute Summary
This section showed how to attach a C++ data object to each cell, update that object from C++, expose it through a Python wrapper, and handle more complex STL types by adding explicit SWIG templates.