Building A Growth Steppable In DeveloperZone
DeveloperZone lets you build C++ plugins and steppables without adding them to the main CC3D source tree. This is useful when you are developing an extension module, testing an idea, or distributing custom C++ code separately from core CC3D.
This example uses Windows paths and assumes that the CC3D repository is cloned to D:\CC3D_PY3_GIT\CompuCell3D. On Linux and macOS the same source layout applies, but the build generator and compiler commands differ.
To add a steppable in DeveloperZone, open Twedit++ and choose CC3D C++ -> Generate New Module....
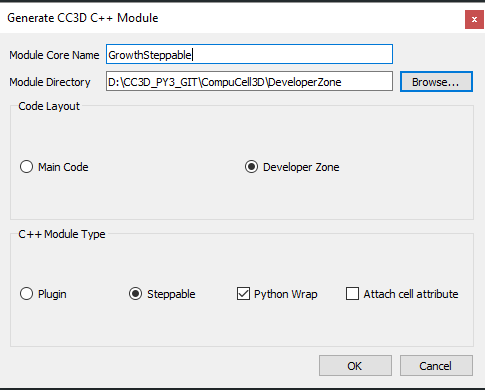
Set Module Directory to D:\CC3D_PY3_GIT\CompuCell3D\DeveloperZone. This is the important difference from generating a core steppable, where the module directory would be a folder under CompuCell3D/core/CompuCell3D/steppables.
This example also checks Python Wrap so that later sections can show how XML and Python can both control the C++ steppable. Python wrapping is optional. If your module only needs XML configuration and C++ execution, you can leave it disabled.
After you click OK, Twedit++ generates template steppable code:
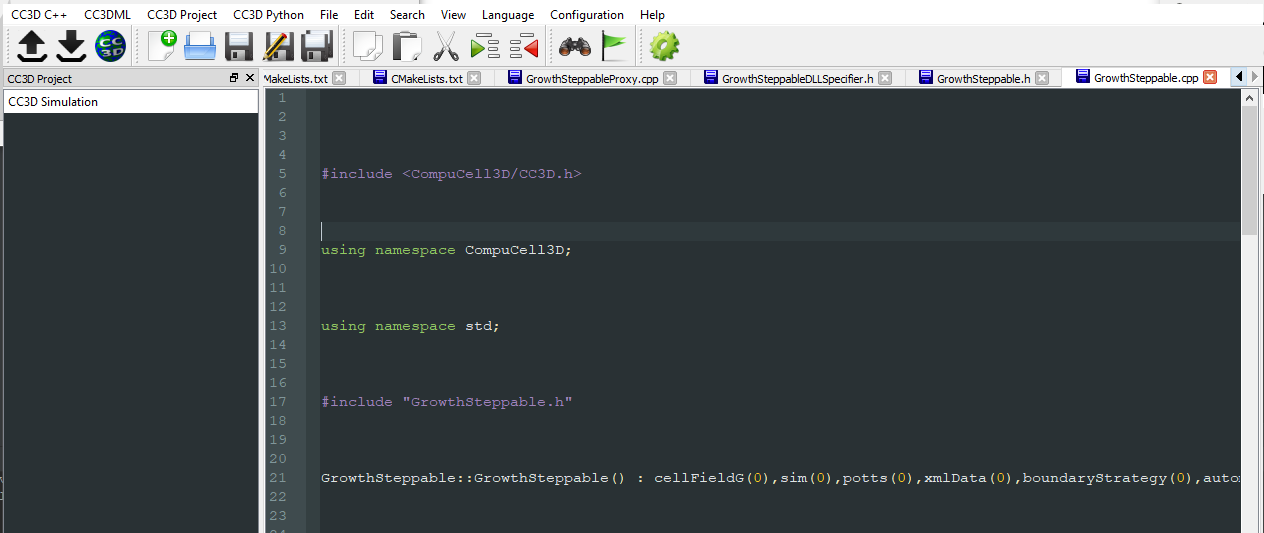
Next, copy the growth logic from the earlier core-code example into the DeveloperZone module. Only the modified files are shown here:
GrowthSteppable.h:
 1#ifndef GROWTHSTEPPABLESTEPPABLE_H
 2#define GROWTHSTEPPABLESTEPPABLE_H
 3#include <CompuCell3D/CC3D.h>
 4#include "GrowthSteppableDLLSpecifier.h"
 5
 6namespace CompuCell3D {
 7
 8    template <class T> class Field3D;
 9
10    template <class T> class WatchableField3D;
11
12    class Potts3D;
13
14    class Automaton;
15
16    class BoundaryStrategy;
17
18    class CellInventory;
19
20    class CellG;
21
22  class GROWTHSTEPPABLE_EXPORT GrowthSteppable : public Steppable {
23
24    WatchableField3D<CellG *> *cellFieldG;
25
26    Simulator * sim;
27
28    Potts3D *potts;
29
30    CC3DXMLElement *xmlData;
31
32    Automaton *automaton;
33
34    BoundaryStrategy *boundaryStrategy;
35
36    CellInventory * cellInventoryPtr;
37
38    Dim3D fieldDim;
39
40  public:
41
42    GrowthSteppable ();
43
44    virtual ~GrowthSteppable ();
45
46    std::map<unsigned int, double> growthRateMap;
47
48    // SimObject interface
49
50    virtual void init(Simulator *simulator, CC3DXMLElement *_xmlData=0);
51
52    virtual void extraInit(Simulator *simulator);
53
54
55    //steppable interface
56
57    virtual void start();
58
59    virtual void step(const unsigned int currentStep);
60
61    virtual void finish() {}
62
63
64    //SteerableObject interface
65
66    virtual void update(CC3DXMLElement *_xmlData, bool _fullInitFlag=false);
67
68    virtual std::string steerableName();
69
70    virtual std::string toString();
71
72  };
73
74};
75
76#endif
and GrowthSteppable.cpp
  1#include <CompuCell3D/CC3D.h>
  2using namespace CompuCell3D;
  3using namespace std;
  4#include "GrowthSteppable.h"
  5
  6
  7GrowthSteppable::GrowthSteppable() :
  8cellFieldG(0),sim(0),potts(0),xmlData(0),
  9boundaryStrategy(0),automaton(0),cellInventoryPtr(0){}
 10
 11GrowthSteppable::~GrowthSteppable() {
 12
 13}
 14
 15void GrowthSteppable::init(Simulator *simulator, CC3DXMLElement *_xmlData) {
 16
 17  xmlData=_xmlData;
 18
 19  potts = simulator->getPotts();
 20
 21  cellInventoryPtr=& potts->getCellInventory();
 22
 23  sim=simulator;
 24
 25  cellFieldG = (WatchableField3D<CellG *> *)potts->getCellFieldG();
 26
 27  fieldDim=cellFieldG->getDim();
 28
 29  simulator->registerSteerableObject(this);
 30
 31  update(_xmlData,true);
 32}
 33
 34void GrowthSteppable::extraInit(Simulator *simulator){
 35
 36}
 37
 38void GrowthSteppable::start(){
 39
 40    CellInventory::cellInventoryIterator cInvItr;
 41    CellG * cell = 0;
 42
 43    for (cInvItr = cellInventoryPtr->cellInventoryBegin(); cInvItr != cellInventoryPtr->cellInventoryEnd(); ++cInvItr)
 44    {
 45
 46        cell = cellInventoryPtr->getCell(cInvItr);
 47        cell->targetVolume = 25.0;
 48        cell->lambdaVolume = 2.0;
 49    }
 50}
 51
 52void GrowthSteppable::step(const unsigned int currentStep){
 53
 54    CellInventory::cellInventoryIterator cInvItr;
 55
 56    CellG * cell=0;
 57
 58   if (currentStep > 100)
 59       return;
 60
 61    std::map<unsigned int, double>::iterator mitr;
 62
 63    for(cInvItr=cellInventoryPtr->cellInventoryBegin() ; cInvItr !=cellInventoryPtr->cellInventoryEnd() ;++cInvItr )
 64    {
 65
 66        cell=cellInventoryPtr->getCell(cInvItr);
 67
 68        mitr = this->growthRateMap.find((unsigned int)cell->type);
 69
 70        if (mitr != this->growthRateMap.end()){
 71            cell->targetVolume += mitr->second;
 72        }
 73
 74    }
 75
 76}
 77
 78void GrowthSteppable::update(CC3DXMLElement *_xmlData, bool _fullInitFlag){
 79
 80    automaton = potts->getAutomaton();
 81
 82    ASSERT_OR_THROW("CELL TYPE PLUGIN WAS NOT PROPERLY INITIALIZED YET. MAKE SURE THIS IS THE FIRST PLUGIN THAT YOU SET", automaton)
 83
 84    set<unsigned char> cellTypesSet;
 85
 86    CC3DXMLElementList growthVec = _xmlData->getElements("GrowthRate");
 87
 88    for (int i = 0; i < growthVec.size(); ++i) {
 89        unsigned int cellType = growthVec[i]->getAttributeAsUInt("CellType");
 90        double growthRateTmp = growthVec[i]->getAttributeAsDouble("Rate");
 91        this->growthRateMap[cellType] = growthRateTmp;
 92    }
 93
 94    //boundaryStrategy has information about pixel neighbors
 95    boundaryStrategy=BoundaryStrategy::getInstance();
 96
 97}
 98
 99std::string GrowthSteppable::toString(){
100
101   return "GrowthSteppable";
102}
103
104std::string GrowthSteppable::steerableName(){
105
106   return toString();
107}
The update function parses XML entries with the following GrowthSteppable syntax:
<Steppable Type="GrowthSteppable">
    <GrowthRate CellType="1" Rate="1.3"/>
    <GrowthRate CellType="2" Rate="1.7"/>
</Steppable>
Note
Starting with CC3D 4.3.0, DeveloperZone compilation setup is generated automatically for supported compilers. Follow Configuring DeveloperZone Projects for compilation for the current setup procedure.
After generating the module and editing the two files above, configure and build DeveloperZone. The screenshots below use CMake GUI and Visual Studio on Windows. On Linux and macOS the configuration inputs are similar, but the build step uses the platform compiler from the conda environment.
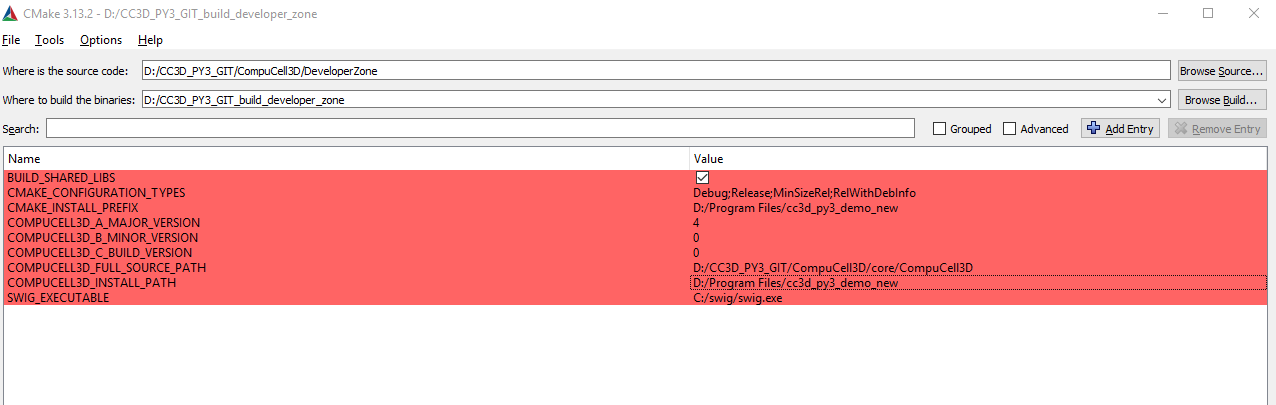
First we point to the folder where DeveloperZone is (Where the source code is). In our case it is
D:\CC3D_PY3_GIT\CompuCell3D\DeveloperZone and location for our Visual Studio project D:/CC3D_PY3_GIT_build_developer_zone (see Where to build the binaries)
Then we after click Configure CMake will display the following dialog:

Make sure to select Visual Studio 14 2015 Win64 (we assume we are using 64-bit version of CC3D). If you are using
32-bit version then you would select Visual Studio 14 2015
Next, we set CMAKE_INSTALL_PREFIX and COMPUCELL3D_INSTALL_PATH to the folder where CC3D is installed -
D:\Program Files\cc3d_py3_demo_new .
We also set where main CC3D code-base is COMPUCELL3D_FULL_SOURCE_PATH D:/CC3D_PY3_GIT/CompuCell3D/core/CompuCell3D
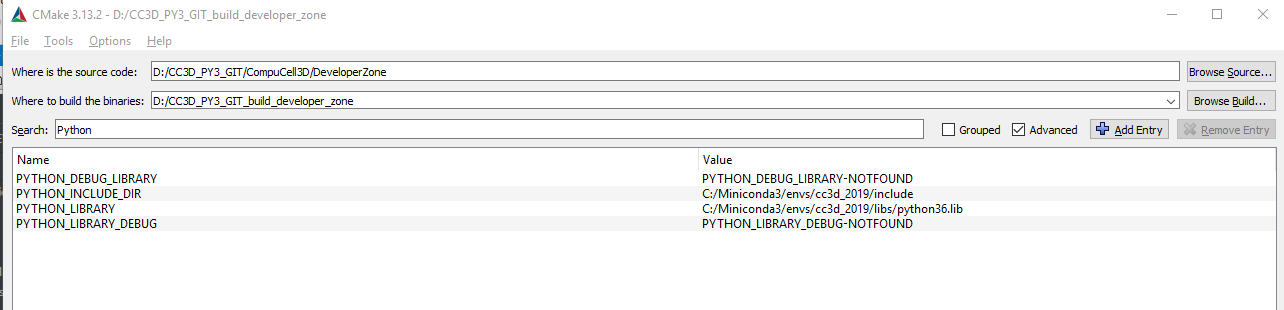
Next, we set version number (4, 0, 0). We are almost done but since DeveloperZone also compiles Python module
we must set Python paths as follows (you need to specify Python include directory and Python library path):
Note
It is perfectly fine to compile DeveloperZone modules without using Python. If this is what you would like to do, just comment out line add_subdirectory(pyinterface) in DeveloperZone/CMakeLists.txt
After we configured all paths in CMake GUI we press Configure button and then Generate button. The
VisualStudio Project will be placed in D:/CC3D_PY3_GIT_build_developer_zone (see
Where to build the binaries at the top of CMake GUI). We will open it next and
will show you how to compile plugins and steppables in the DeveloperZone
Compiling DeveloperZone In Visual Studio
Now that we created Visual Studio project for Developer Zone we will show you how to set up compilation.
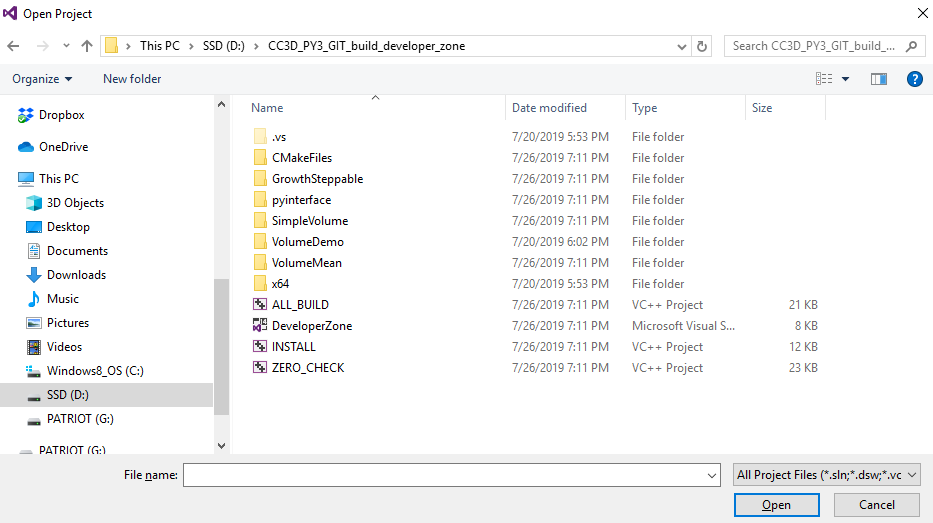
We open up Visual Studio and navigate to File->Open->Project/Solution... and in the File Open Dialog we go to
D:/CC3D_PY3_GIT_build_developer_zone and select ALL_BUILD.vcxproj
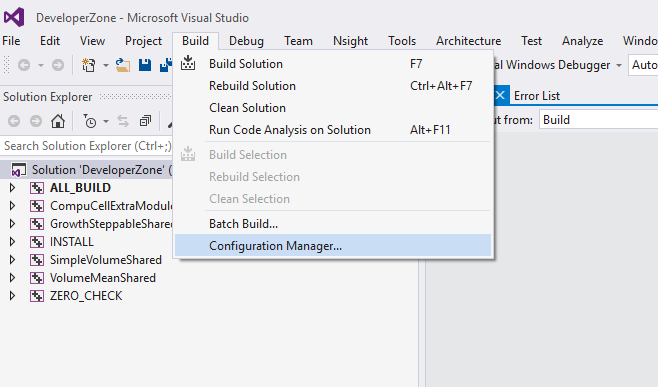
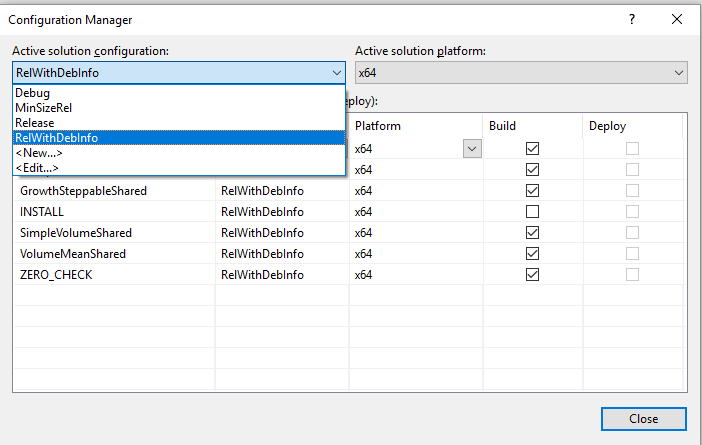
After DeveloperZone Visual Studio project gets loaded we go to Build->Configuration Manager... and from the
pull down menu Active Solution Configuration (at the top of the dialog box) we select RelWithDebInfo:
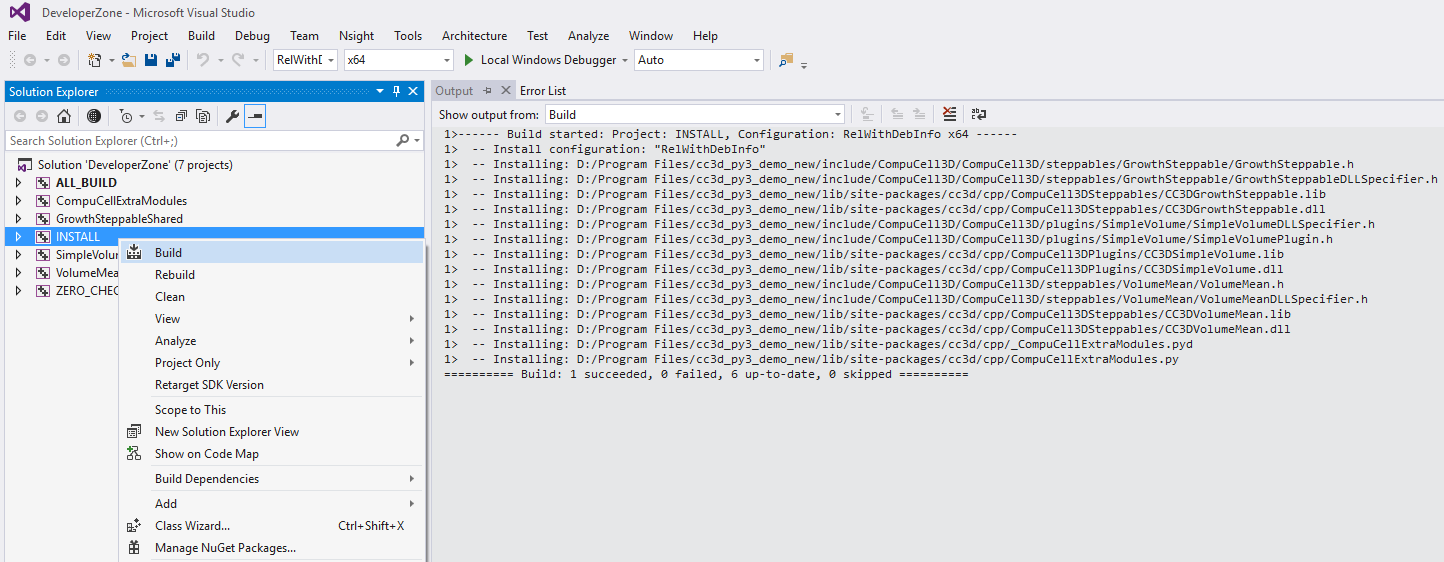
Next, to start compilation, we right-click on ALL_BUILD and from the context menu select Build:
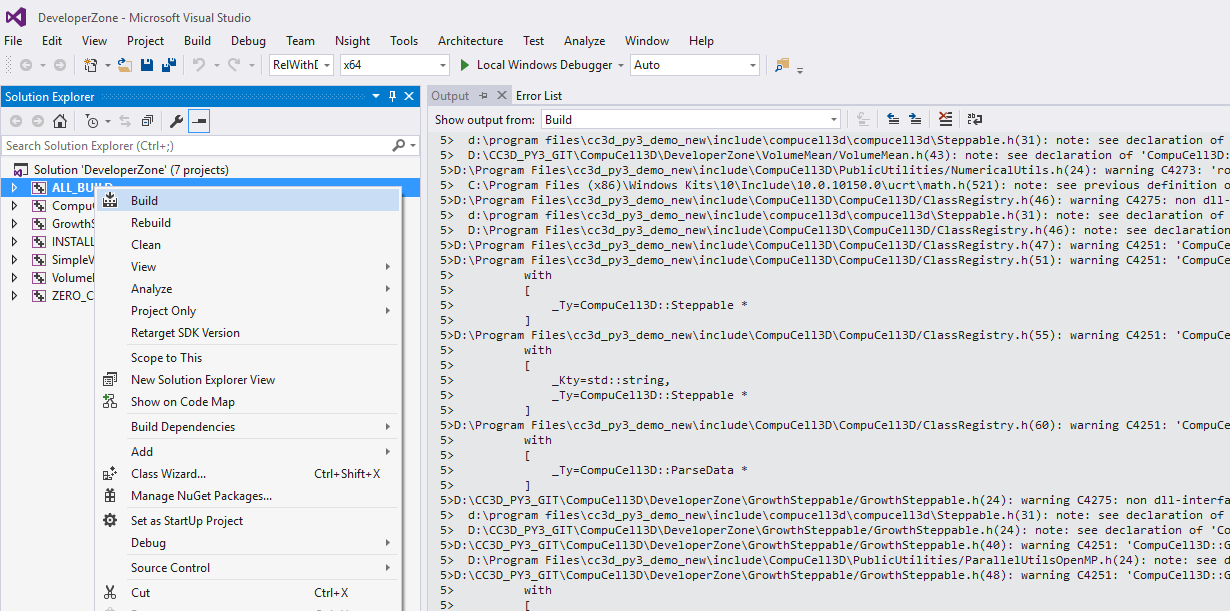
Notice that there are additional modules in addition to our GrowthSteppable. Take a looks at those. They show
how to write simple modules (plugins or steppables).
After the compilation finished and there are no errors, we right-click at INSTALL subproject and from the context
menu we select Build. This will install our newly created GrowthSteppable in the CC3D installation directory
that we specified during CMake configuration (D:/Program Files/cc3d_py3_demo_new)
At this point we can build a simulation that will use newly created GrowthSteppable
Using The DeveloperZone Steppable In A Simulation
After the C++ code compiles and installs, using the new steppable in a simulation is simple. Add the following XML block to any simulation where cells of type 1 should increase target volume by 1.3 pixels per MCS and cells of type 2 should increase target volume by 1.7 pixels per MCS:
<Steppable Type="GrowthSteppable">
    <GrowthRate CellType="1" Rate="1.3"/>
    <GrowthRate CellType="2" Rate="1.7"/>
</Steppable>
Note
The XML name of a steppable or plugin comes from the label registered in its proxy file, not necessarily from the C++ class name. In this example GrowthSteppableProxy.cpp registers growthSteppableProxy("GrowthSteppable", ...), so the XML uses <Steppable Type="GrowthSteppable">. If the proxy registered "MyGrowthSteppable" instead, the XML would need to use <Steppable Type="MyGrowthSteppable">.
Here are the results of the simulation at MCS 0, 20, and 40:
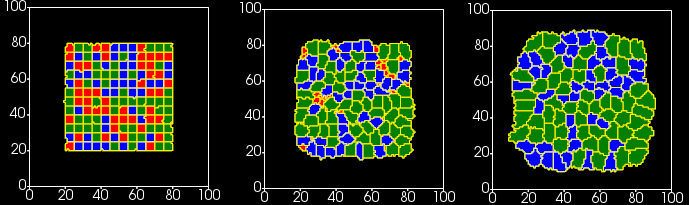
The simulation contains three cell types, but the XML specifies growth rates for only two of them. The type without an explicit growth rate is squeezed by growing neighbors and disappears by MCS 40. Green cells become larger than blue cells because they use the larger growth rate.
Because this steppable modifies targetVolume directly, the simulation must load the Volume plugin. Here we use the local-flex form, <Plugin Name="Volume"/>, which loads the plugin without global XML parameters. The per-cell targetVolume and lambdaVolume values are assigned in C++ code:
<CompuCell3D Revision="20190604" Version="4.0.0">

   <Potts>

      <!-- Basic properties of CPM (GGH) algorithm -->
      <Dimensions x="100" y="100" z="1"/>
      <Steps>100000</Steps>
      <Temperature>10.0</Temperature>
      <NeighborOrder>1</NeighborOrder>
   </Potts>

   <Plugin Name="CellType">

      <!-- Listing all cell types in the simulation -->
      <CellType TypeId="0" TypeName="Medium"/>
      <CellType TypeId="1" TypeName="A"/>
      <CellType TypeId="2" TypeName="B"/>
      <CellType TypeId="3" TypeName="C"/>
   </Plugin>

   <Plugin Name="Volume"/>

   <Plugin Name="CenterOfMass">

      <!-- Module tracking center of mass of each cell -->
   </Plugin>

   <Plugin Name="Contact">
      <!-- Specification of adhesion energies -->
      <Energy Type1="Medium" Type2="Medium">10.0</Energy>
      <Energy Type1="Medium" Type2="A">10.0</Energy>
      <Energy Type1="Medium" Type2="B">10.0</Energy>
      <Energy Type1="Medium" Type2="C">10.0</Energy>
      <Energy Type1="A" Type2="A">10.0</Energy>
      <Energy Type1="A" Type2="B">10.0</Energy>
      <Energy Type1="A" Type2="C">10.0</Energy>
      <Energy Type1="B" Type2="B">10.0</Energy>
      <Energy Type1="B" Type2="C">10.0</Energy>
      <Energy Type1="C" Type2="C">10.0</Energy>
      <NeighborOrder>4</NeighborOrder>
   </Plugin>

   <Steppable Type="UniformInitializer">

      <!-- Initial layout of cells in the form of rectangular slab -->
      <Region>
         <BoxMin x="20" y="20" z="0"/>
         <BoxMax x="80" y="80" z="1"/>
         <Gap>0</Gap>
         <Width>5</Width>
         <Types>A,B,C</Types>
      </Region>
   </Steppable>

    <Steppable Type="GrowthSteppable">
        <GrowthRate CellType="1" Rate="1.3"/>
        <GrowthRate CellType="2" Rate="1.7"/>
    </Steppable>

</CompuCell3D>
Note
GrowthSteppable is listed after UniformInitializer on purpose. CC3D calls steppables in the order in which they appear in XML. If GrowthSteppable ran first, its start function would iterate over an empty cell inventory because UniformInitializer would not have created cells yet.
Note
The growth rates 1.3 and 1.7 are intentionally high for illustration. Real simulations usually need smaller rates so cells can equilibrate on the lattice.
Full simulation can be downloaded here zip and full code for
GrowthSteppable is here zip. You can also access both example
and C++ code by going directly to CompuCell3D/DeveloperZone