Windows
In order to compile entire CC3D code on Windows (not just the developer zone) you need to install Visual Studio 2015 Community Edition (free). Here is a reference page on how to find the relevant installation bundles. Make sure you use CommunityEdition: https://stackoverflow.com/questions/44290672/how-to-download-visual-studio-community-edition-2015-not-2017
You can also install Visual Studio 2019 from Microsoft Store. Both of those frameworks should work fine when it comes to compilation of CC3D code. One thing to remember that is you want to recompile the code it is often a good idea to close and reopen Visual Studio because otherwise compilations may take a long time and your IDE may even freeze - no matter how fast your computer is. If you are using Visual Studio 2026, see Visual Studio 2026.

Once you installed Visual Studio 2015 Community Edition or Visual Studio 2019 Community Edition (you may need to restart your computer after the installation is finished) you need to install Miniconda3 from heere: https://docs.conda.io/projects/miniconda/en/latest/
Once you install the latest version of Miniconda for your operating system you should install mamba into base conda environment:
conda install -c conda-forge mamba
Note, -c conda-forge points to conda-forge channel that is one of the most reliable repositories of conda packages.
Note
If you have CompuCell3D installed on your Computer. you may want to temporarily move it to a different folder to avoid clashes with conda installed inside CompuCell3D folder. Use either windows explorer or if you prefer to use command line (Win + R → cmd → Enter) run the following
ren "C:\CompuCell3D" "CompuCell3D_1"
Let’s start by cloning CompuCell3D repository. To do so, we run the following commands
cd %USERPROFILE%
mkdir src
cd src
git clone https://github.com/CompuCell3D/CompuCell3D.git
At this point you should have the entire CompuCell3D repository stored inside src directory located in your home folder - we use standard windows environment variable to refer to home folder %USERPROFILE%
Note
If you would like to develop custom CompuCell3D module that you would like to contribute to CompuCell3D repository, you might want to fork CompuCell3D repository to your github account and do all the work there. Once you are done, you would open pull request from your fork of CompuCell3D repository to official CompuCell3d repository hosted by us. To fork CompuCell3D core code repository from https://github.com/CompuCell3D/CompuCell3D, simply log in to your github account, navigate to the CompuCell3D link and click Fork button in the upper right corner of the page:

Once you forked the code, go ahead and clone it from your repository (not from CompuCell3D repository).
To clone repository you follow command pattern below:
cd %USERPROFILE%
mkdir src
cd src
git clone git@github.com:<your_github_name>/CompuCell3D.git
Now we are ready to start configuring CompuCell3D build. The entire process of setting up code build for CC3D is based on conda-recipe that we use to build conda packages. It might be worth looking at the content of %USERPROFILE%/src/CompuCell3D/conda-recipes/ directory , in particular at the %USERPROFILE%/src/CompuCell3D/conda-recipes/bld.bat file. We will leverage content of this file to construct invocation of the cmake command that will set up compilation of CompuCell3D in Visual Studio 2019.
Note
I assume that CompuCell3D repository was cloned to %USERPROFILE%/src/CompuCell3D. If you cloned it to a different folder you will need to adjust paths accordingly
At this point we need to prepare conda environment that has all dependencies needed to compile CC3D. The main ones include Python and the VTK library, but there are many others so instead of listing them all here, let’s leverage conda packages that we use to distribute CompuCell3D. Those key packages that are required to compile CC3D are stored in the conda environment file below. Copy the content of this file ave it as env310.yaml. I saved mine to %USERPROFILE%/src/env-cc3d.yaml
name: cc3d-compile
channels:
  - conda-forge
  - compucell3d
dependencies:
  - python=3.12
  - numpy=2.2.6
  - vtk=9.2
  - eigen>=3.4,<3.5
  - tbb-devel=2021
  - boost=1.85
  - cmake=3.28
  - swig=4
  - psutil
  - deprecated
  - cc3d-network-solvers>=0.3.1
  - scipy
  - pandas
  - jinja2
  - lxml
  - simservice
  - notebook
  - ipywidgets
  - ipyvtklink
  - sphinx
  - graphviz
  - qscintilla2
  - webcolors
  - requests
  - pyqt=5
  - pyqtgraph
  - pyqtwebkit
  - chardet
  - fipy
Notice, the first line name: cc3d-compile specifies the name oft the conda environment this file will create - it will be called cc3d-compile
Next two lines specify conda channels (repositories) from which the packages listed in the file will be downloaded from
channels:
  - conda-forge
  - compucell3d
Here we list conda packages repositories. conda-forge is by far the most popular and package-rich conda package repository and compucell3d is the repository that stores dependencies needed to install or build compucell3d. The dependencies section lists all packages needed to build core C++ Compucell3D code. Notice, we specify particular Python version 3.12 . It is important to know which version of Python you are building packages for otherwise you may see unexpected runtime surprises so always pay attention to nuances like this.
Let’s use this file to actually create conda environment. Open miniconda console and run the following command:
cd %USERPROFILE%/src
mamba env create -f %USERPROFILE%/src/env-cc3d.yaml
the terminal output will look similar to the one below:
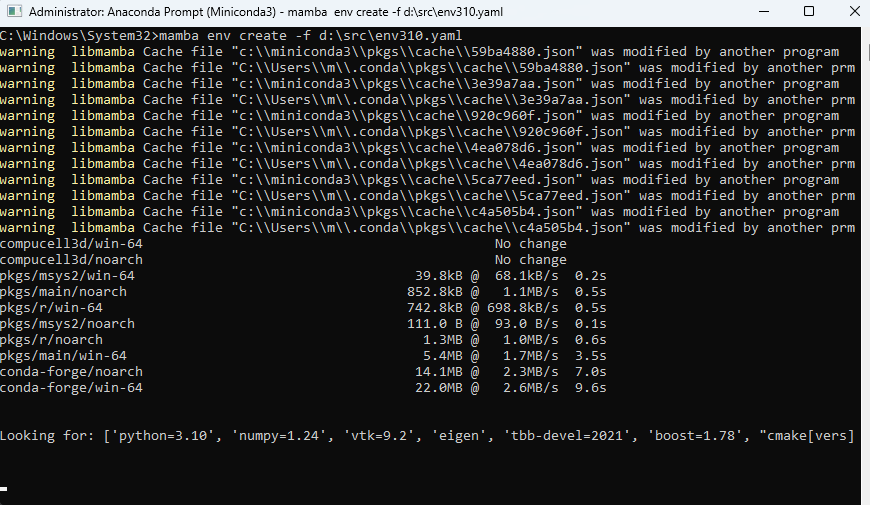
and after everything is installed we will get the prompt to activate newly created conda environment conda
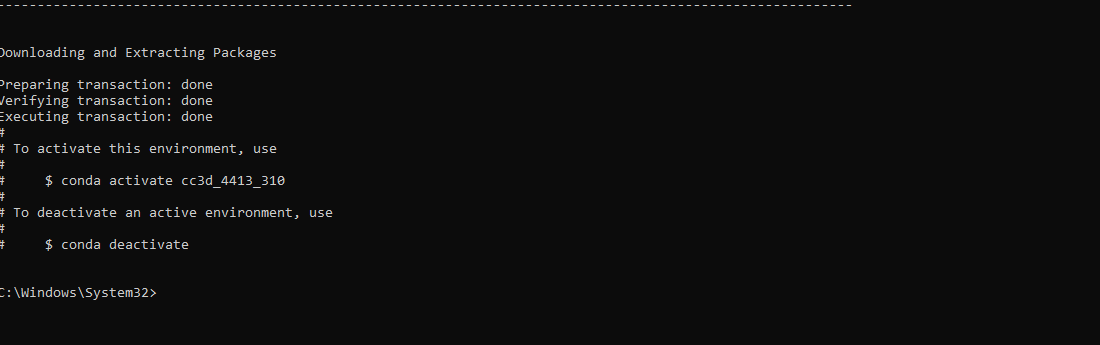
Note
if you are having troubles running mamba - for example if you get permission error you may need to perform conda creation in the Administrator mode or adjust permissions for your entire miniconda installation
Let’s activate the newly created conda environment (from now on you should be able to use regular console, not the one that runs in the Administrator mode). This works best if you run from a Visual Studio developer command prompt such as x64 Native Tools Command Prompt for VS 2019 as opposed to the Miniforge or Miniconda prompt.
conda activate cc3d-compile
We are ready to call cmake to configure CC3D C++ code compilation.
Open up a new file in your editor and paste the following cmake invocation. If you are using Visual Studio 2019 (recommended version) the code snippet looks as follows:
cmake -S %USERPROFILE%/src/CompuCell3D/CompuCell3D -B %USERPROFILE%/src/CompuCell3D_build -DPython3_EXECUTABLE=c:\miniconda3\envs\cc3d-compile\python.exe -DNO_OPENCL=ON -DBUILD_STANDALONE=OFF -G "Visual Studio 16 2019" -DCMAKE_INSTALL_PREFIX=%USERPROFILE%/install_projects/cc3d-compile
For Visual Studio 2015 you would use
cmake -S %USERPROFILE%/src/CompuCell3D/CompuCell3D -B %USERPROFILE%/src/CompuCell3D_build -DPython3_EXECUTABLE=c:\miniconda3\envs\cc3d-compile\python.exe -DNO_OPENCL=ON -DBUILD_STANDALONE=OFF -G "Visual Studio 14 2015 Win64" -DCMAKE_INSTALL_PREFIX=%USERPROFILE%/install_projects/cc3d-compile
For Visual Studio 2026 you should use the updated conda environment and generator described in Visual Studio 2026.
the difference is for the -G option. Let’s see below what each option means
GPU Solvers
If you would like to enable GPU solvers we recommend that you use Visual Studio 2019 and the cmake command would look as follows
cmake -S %USERPROFILE%/src/CompuCell3D/CompuCell3D -B %USERPROFILE%/src/CompuCell3D_build -DPython3_EXECUTABLE=c:\miniconda3\envs\cc3d-compile\python.exe -DNO_OPENCL=OFF -DBUILD_STANDALONE=OFF -G "Visual Studio 16 2019" -DCMAKE_INSTALL_PREFIX=%USERPROFILE%/install_projects/cc3d-compile
The only difference here is the -DNO_OPENCL=OFF option that tells Cmake system to include OpenCL modules.
Note
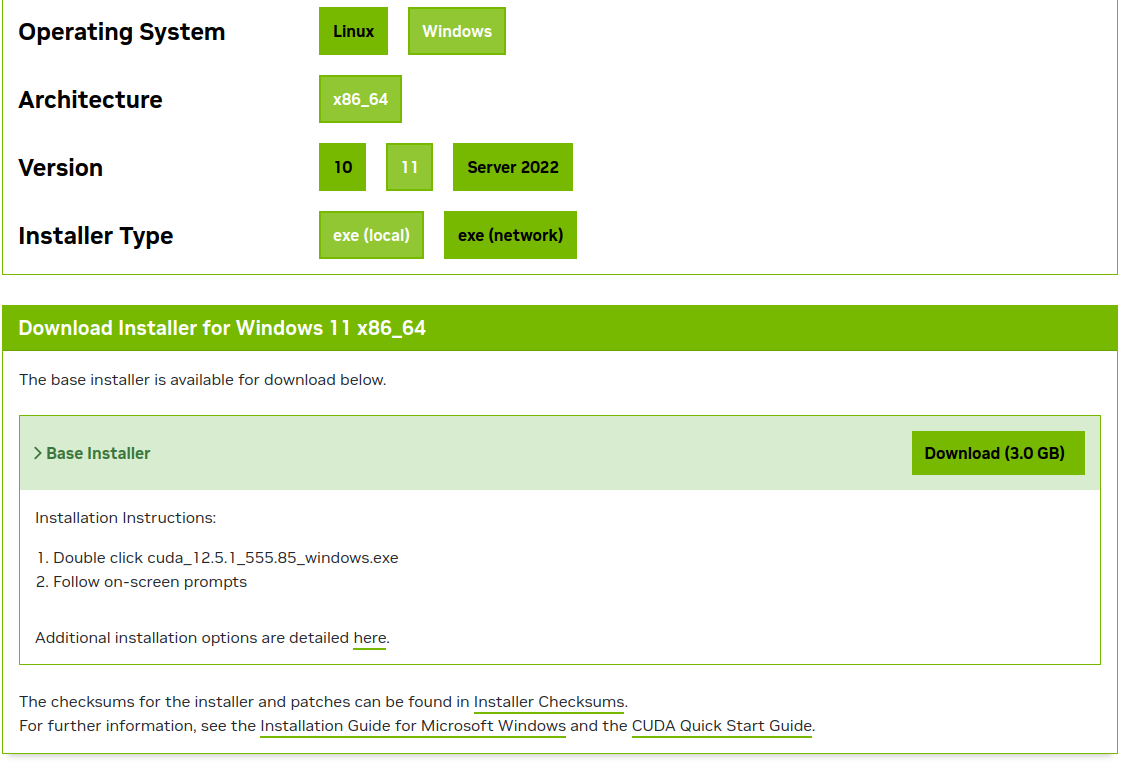
In order for GPU solvers to work you need to have a computer with a GPU and install GPU Toolkit. For example if you have a computer with NVidia RTX 30x0 or 40x0 card you would install Nvidia CUDA toolkit and this would be sufficient to get your GPU solvers compiled and running on your machine. Simply navigate to https://developer.nvidia.com/cuda-downloads:
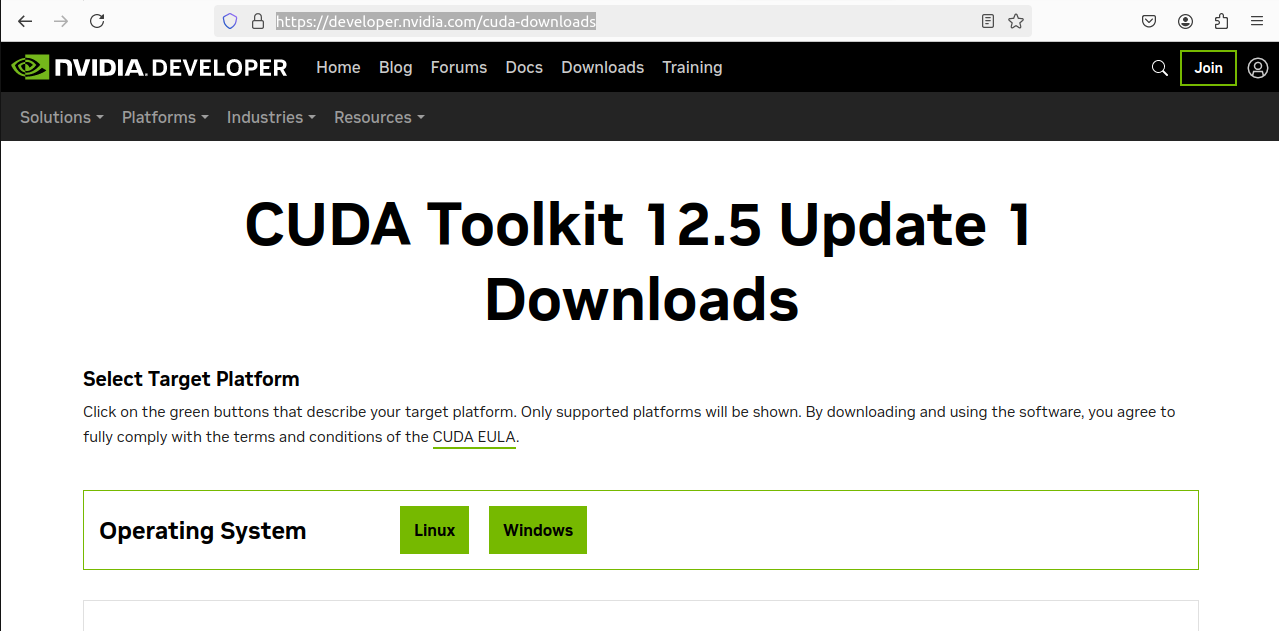
select Windows and fill the details for Architecture, Version and Installer Type of your Windows - in our case we selected windows, x86_64, 11, exe (local) and follow the instruction given on the download page
Let us explain what each setting/flag means.
-S option allows you to specify the directory that stores and entry CMakeLists.txt file. In my case it is located in %USERPROFILE%\src\CompuCell3D\CompuCell3D where %USERPROFILE%\src\CompuCell3D is a path to repository and inside this folder there is CompuCell3D subfolder that stores CMakeLists.txt file.
-B option specifies where the build files are written to. The build files include intermediate compiler outputs but also Visual Studio project that we will open in the Visual Studio IDE.
-G specifies Cmake generator. CMake can generate project files for multiple IDEs and build system. Here we are specifying Visual Studio 14 2015 Win64 so that CMake can generate VS 2015 project for Win64. For Visual Studio 2019 you use Visual Studio 16 2019 . To get the list of all available Cmake generators type the following:
cmake --help
The next set of options all begin with -D. -D is used to set variables that are defined in CMakeLists.txt files or that are standard CMake variables. Let’s go over those:
-DPython3_EXECUTABLE=c:\miniconda3\envs\cc3d-compile\python.exe - here we specify path to python executable. The Python3_EXECUTABLE is defined inside CMake package that sets up all Python related paths and we need to only specify python executable
-DNO_OPENCL=ON - specifies that we do not want to build GPU diffusion solvers. Change it to OFF and the we you will build GPU solvers.
-DBUILD_STANDALONE=OFF - this is a flag that determines how the output files will be arranged. If we use OFF setting plugin steppable and python bindings will be installed into miniconda environment directly - this is the recommended approach.
Note
You will need to do file copy operation after each compilation followed by Install step. It is a bit of the inconvenience but we will fix it in the future release
-DCMAKE_INSTALL_PREFIX=%USERPROFILE%\install_projects\cc3d-compile sets standard CMake variable tha specifies installation directory.
Obviously you may need to adjust paths so that they correspond to your file system layout. If you need a template for the above command here it is:
cmake -S <PATH TO CompuCell3D REPO>\CompuCell3D -B <dir to store build files> -DPython3_EXECUTABLE=<python executable - from conda environment> -DNO_OPENCL=ON -DBUILD_STANDALONE=OFF -G "Visual Studio 16 2019" -DCMAKE_INSTALL_PREFIX=<dir where compiled CompuCell3D will be written to>
After we execute the above command (with paths adjusted to your file system layout) we will get the output that looks something as follows:
(cc3d-compile) C:\Users\m\src>cmake -S %USERPROFILE%/src/CompuCell3D/CompuCell3D -B %USERPROFILE%/src/CompuCell3D_build -DPython3_EXECUTABLE=c:\miniconda3\envs\cc3d-compile\python.exe -DNO_OPENCL=ON  -DBUILD_STANDALONE=OFF -G "Visual Studio 16 2019" -DCMAKE_INSTALL_PREFIX=%USERPROFILE%/install_projects/cc3d-compile
-- Selecting Windows SDK version 10.0.19041.0 to target Windows 10.0.26100.
-- The C compiler identification is MSVC 19.29.30157.0
-- The CXX compiler identification is MSVC 19.29.30157.0
-- Detecting C compiler ABI info
-- Detecting C compiler ABI info - done
-- Check for working C compiler: C:/Program Files (x86)/Microsoft Visual Studio/2019/Community/VC/Tools/MSVC/14.29.30133/bin/Hostx64/x64/cl.exe - skipped
-- Detecting C compile features
-- Detecting C compile features - done
-- Detecting CXX compiler ABI info
-- Detecting CXX compiler ABI info - done
-- Check for working CXX compiler: C:/Program Files (x86)/Microsoft Visual Studio/2019/Community/VC/Tools/MSVC/14.29.30133/bin/Hostx64/x64/cl.exe - skipped
-- Detecting CXX compile features
-- Detecting CXX compile features - done
-- Found OpenMP_C: -openmp (found version "2.0")
-- Found OpenMP_CXX: -openmp (found version "2.0")
-- Found OpenMP: TRUE (found version "2.0")
openmp c flags -openmp
openmp cxx flags -openmp
-- Found Python3: c:\miniconda3\envs\cc3d-compile\python.exe (found version "3.12.2") found components: Interpreter Development NumPy Development.Module Development.Embed
Python3_FOUND: TRUE
Python3_Interpreter_FOUND: TRUE
Python3_VERSION: 3.12.2
Python3_Development_FOUND: TRUE
Python3_EXECUTABLE: c:\miniconda3\envs\cc3d-compile\python.exe
Python3_Development_FOUND: TRUE
Python3_INCLUDE_DIRS: C:/miniconda3/envs/cc3d-compile/include
Python3_LIBRARIES: C:/miniconda3/envs/cc3d-compile/libs/python312.lib
Python3_LIBRARY_RELEASE: C:/miniconda3/envs/cc3d-compile/libs/python312.lib
Python3_LIBRARY_DIRS: C:/miniconda3/envs/cc3d-compile/libs
Python3_RUNTIME_LIBRARY_DIRS: C:/miniconda3/envs/cc3d-compile
Python3_NumPy_INCLUDE_DIRS: C:/miniconda3/envs/cc3d-compile/Lib/site-packages/numpy/_core/include
Python3_LIBRARY_DIRS C:/miniconda3/envs/cc3d-compile/libs
Python3_SABI_LIBRARY_DIRS
Python3_SITEARCH c:\miniconda3\envs\cc3d-compile\Lib\site-packages
PYTHON_BASE_DIRc:/miniconda3/envs/cc3d-compile
 THIS IS COMPUCELL3D_BUILD_VERSION 0
COMPUCELL3D_C_BUILD_VERSION is 0
GOT VERSION AS 4.7.0
-- Found ZLIB: C:/miniconda3/envs/cc3d-compile/Library/lib/z.lib (found version "1.3.1")
 PUBLIC UTILS OPEN MP FLAG-openmp
expat library local C:/miniconda3/envs/cc3d-compile/Library/lib/expat.lib
-- C:/Users/m/src/CompuCell3D/CompuCell3D
CMake Warning (dev) at core/CompuCell3D/steppables/PDESolvers/FindEigen3.cmake:73:
  Syntax Warning in cmake code at column 35

  Argument not separated from preceding token by whitespace.
Call Stack (most recent call first):
  core/CompuCell3D/steppables/PDESolvers/CMakeLists.txt:15 (find_package)
This warning is for project developers.  Use -Wno-dev to suppress it.

'LOCATEDEIGENAT',C:/miniconda3/envs/cc3d-compile/Library/include/Eigen3
-- Found Eigen3: C:/miniconda3/envs/cc3d-compile/Library/include/Eigen3 (Required is at least version "2.91.0")
-- OpenCL disabled
OPENMP FLAGS -openmp
-- Found SWIG: C:/miniconda3/envs/cc3d-compile/Library/bin/swig.exe (found version "4.3.1")
-- Found Python3: c:\miniconda3\envs\cc3d-compile\python.exe (found suitable version "3.12.2", minimum required is "3.12") found components: Interpreter Development.Module Development.Embed
-- Performing Test CMAKE_HAVE_LIBC_PTHREAD
-- Performing Test CMAKE_HAVE_LIBC_PTHREAD - Failed
-- Looking for pthread_create in pthreads
-- Looking for pthread_create in pthreads - not found
-- Looking for pthread_create in pthread
-- Looking for pthread_create in pthread - not found
-- Found Threads: TRUE
-- Found GLEW: C:/miniconda3/envs/cc3d-compile/Library/lib/glew32.lib
-- Found OpenGL: opengl32  found components: OpenGL
-- Found HDF5: hdf5-shared (found version "1.14.3") found components: C HL
-- Found utf8cpp: C:/miniconda3/envs/cc3d-compile/Library/include
-- Found JsonCpp: C:/miniconda3/envs/cc3d-compile/Library/lib/jsoncpp.lib (found suitable version "1.9.5", minimum required is "0.7.0")
-- Found OGG: C:/miniconda3/envs/cc3d-compile/Library/lib/ogg.lib
-- Found THEORA: C:/miniconda3/envs/cc3d-compile/Library/lib/theora.lib
-- Found NetCDF: C:/miniconda3/envs/cc3d-compile/Library/include (found version "4.9.2")
-- Found LibPROJ: C:/miniconda3/envs/cc3d-compile/Library/lib/proj.lib (found version "9.3.1")
-- Found LibXml2: C:/miniconda3/envs/cc3d-compile/Library/lib/xml2.lib (found version "2.13.8")
-- Found GL2PS: C:/miniconda3/envs/cc3d-compile/Library/lib/gl2ps.lib (found suitable version "1.4.2", minimum required is "1.4.2")
-- Found PNG: C:/miniconda3/envs/cc3d-compile/Library/lib/libpng.lib (found version "1.6.50")
-- Found nlohmann_json: C:/miniconda3/envs/cc3d-compile/Library/share/cmake/nlohmann_json/nlohmann_jsonConfig.cmake (found version "3.12.0")
-- Found SQLite3: C:/miniconda3/envs/cc3d-compile/Library/include (found version "3.50.4")
-- Found Eigen3: C:/miniconda3/envs/cc3d-compile/Library/include/eigen3 (found version "3.4.0")
-- Found EXPAT: C:/miniconda3/envs/cc3d-compile/Library/lib/expat.lib (found version "2.5.0")
-- Found double-conversion: C:/miniconda3/envs/cc3d-compile/Library/lib/double-conversion.lib
-- Found LZ4: C:/miniconda3/envs/cc3d-compile/Library/lib/liblz4.lib (found version "1.9.4")
-- Found LZMA: C:/miniconda3/envs/cc3d-compile/Library/lib/lzma.lib (found version "5.8.1")
-- Found JPEG: C:/miniconda3/envs/cc3d-compile/Library/lib/jpeg.lib (found version "80")
-- Found TIFF:  (found version "4.7.1")
-- Found Freetype: C:/miniconda3/envs/cc3d-compile/Library/lib/freetype.lib (found version "2.14.1")
VTK_MAJOR_VERSION=9
NUMPY_INCLUDE_DIR
VTK_LIB_DIRS
THIS IS cc3d_py_source_dir: C:/Users/m/src/CompuCell3D/CompuCell3D/../cc3d
USING EXTERNAL PYTHON
-- Configuring done (19.8s)
CMake Warning (dev) at compucell3d_cmake_macros.cmake:200 (ADD_LIBRARY):
  Policy CMP0115 is not set: Source file extensions must be explicit.  Run
  "cmake --help-policy CMP0115" for policy details.  Use the cmake_policy
  command to set the policy and suppress this warning.

  File:

    C:/Users/m/src/CompuCell3D/CompuCell3D/core/CompuCell3D/steppables/PDESolvers/hpppdesolvers.h
Call Stack (most recent call first):
  core/CompuCell3D/steppables/PDESolvers/CMakeLists.txt:187 (ADD_COMPUCELL3D_STEPPABLE)
This warning is for project developers.  Use -Wno-dev to suppress it.

-- Generating done (1.6s)
-- Build files have been written to: C:/Users/m/src/CompuCell3D_build
The line -- Generating done shows -- Build files have been written to: C:/Users/m/src/CompuCell3D_build.
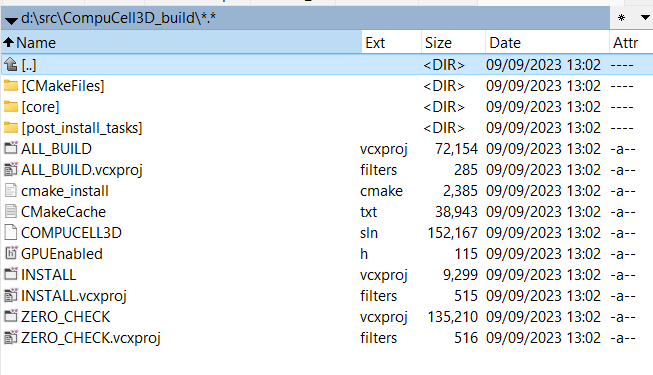
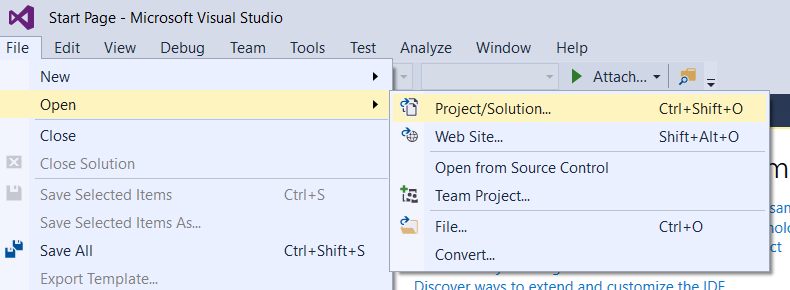
At this point we can open the newly generated project in the Visual Studio 2015 IDE and start compilation. In Visual Studio 2015 navigate to File->Open...->Project/Solution...
and navigate to where VS 2015 files are generated and pick ALL_BUILD.vcxproj

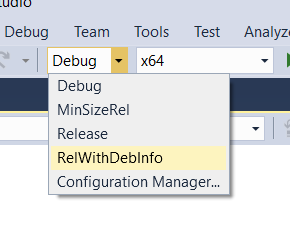
Once the project is loaded we set compile configration (we choose Release from the pull-down menu). RelWithDebInfo may work as well but occasionally you may get compilation or run-time errors.
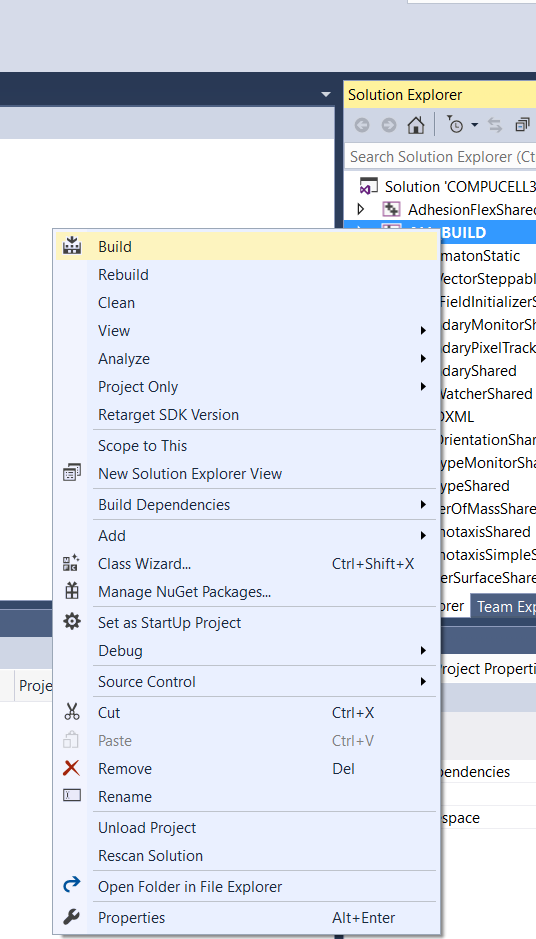
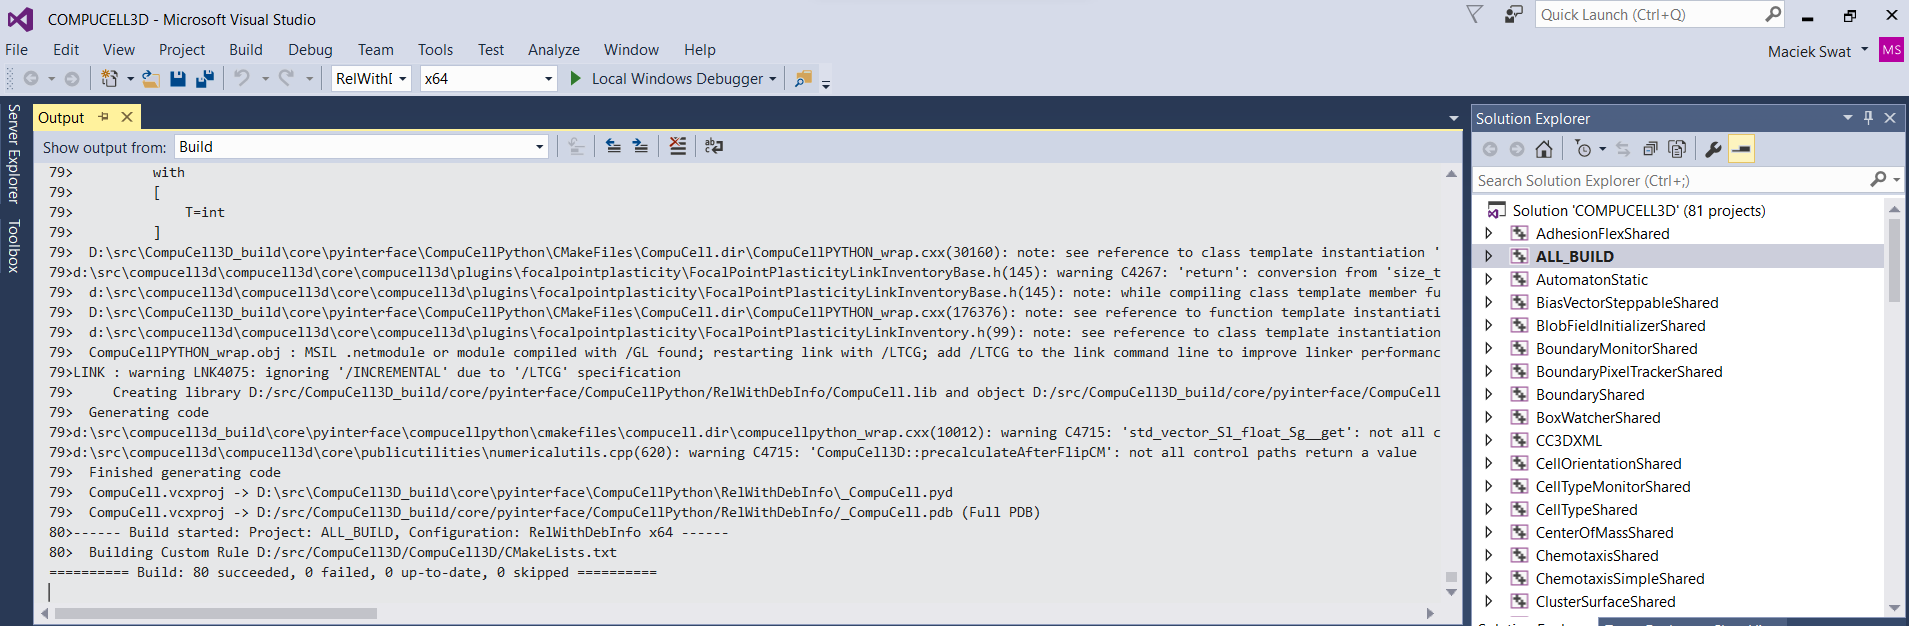
Next, from the Solution Explorer panel, right-click on ALL_BUILD and select Build from context menu
The compilation will start and after a while (say 10-15 minutes on Windows , much faster on other platforms) you will get compilation completion screen
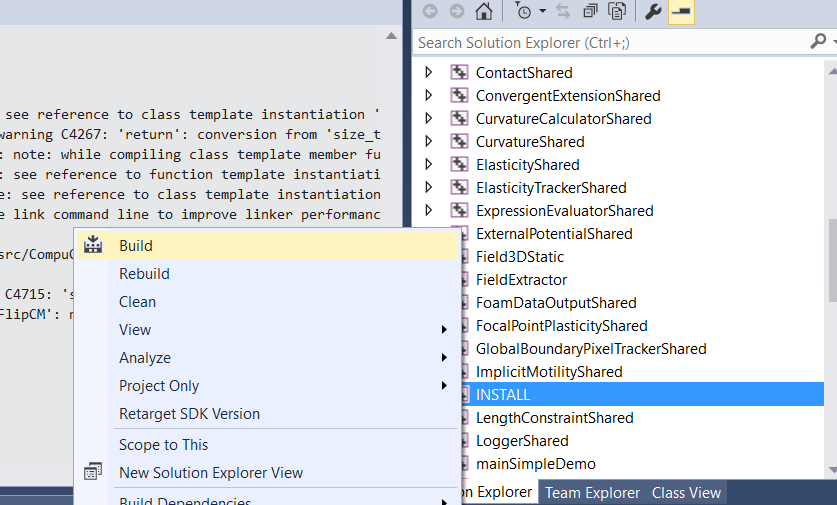
Once compilation succeeded, go ahead and install all the libraries to the target dir:
Find INSTALL subproject in the Solution Explorer, right-click and choose Build to install all the libraries:
and if you take a look at the output screen you will see that some files are installed into c:\Users\m\install_projects\cc3d-compile and some are written directly into conda environment c:\miniconda3\envs\cc3d-compile

Note
If you are getting permission issues during installation , you may need to allow write permissions for conda C:/miniconda3/envs/cc3d-compile folder.
At this point your newly compiled CC3D should be ready to use
Manually installing Player and Twedit ++
Once you installed CC3D to miniconda environment cc3d_4413_310 all that you need to get Player and Twedit working with yor new environment is
to clone those repos
cd %USERPROFILE%\src
git clone https://github.com/CompuCell3D/cc3d-player5.git
git clone https://github.com/CompuCell3D/cc3d-twedit5.git
and copy %USERPROFILE%\src\cc3d-player5\cc3d\player5 folder to c:\miniconda3\envs\cc3d-compile\Lib\site-packages\cc3d\player5\. Similarly, copy
and copy %USERPROFILE%\src\cc3d-player5\cc3d\player5 folder to c:\miniconda3\envs\cc3d-compile\Lib\site-packages\cc3d\player5\. Similarly, copy
%USERPROFILE%\src\cc3d-twedit5\cc3d\twedit5 folder to c:\miniconda3\envs\cc3d-compile\Lib\site-packages\cc3d\twedit5\
To copy, run those commands
xcopy "%USERPROFILE%\src\cc3d-player5\cc3d\player5" "C:\miniconda3\envs\cc3d-compile\Lib\site-packages\cc3d\player5" /E /I /Y

xcopy "%USERPROFILE%\src\cc3d-twedit5\cc3d\twedit5" "C:\miniconda3\envs\cc3d-compile\Lib\site-packages\cc3d\twedit5" /E /I /Y
Running Newly Compiled CC3D
At this point you can open Player or Twedit through Miniconda prompt (make sure you are still in the cc3d-compile environment)
conda activate cc3d-compile
python -m cc3d.player5
Using newly compiled binaries with the UI
Follow this guide to setup PyCharm to run the Player and use your newly compiled C++ code - Running Player and Twedit++ from PyCharm.
Visual Studio 2026
The workflow for Visual Studio 2026 is very similar to the Visual Studio 2019 workflow described above. The main differences are the conda environment definition and the CMake generator. As before, we assume that your CompuCell3D repository is located in %USERPROFILE%/src/CompuCell3D. If you use a different location, adjust the paths accordingly.
Note
Support for Visual Studio 2026 is experimental. We tested this workflow and it works, but it requires a conda environment with different versions of some packages: cmake=4.2.3, vtk=9.3.1, and boost=1.85. We found that creating this environment using the shorter recipe style shown earlier may not work reliably, so below we provide a complete environment blueprint. This is the main reason we currently treat Visual Studio 2026 compilation support as experimental.
To keep this setup separate from the Visual Studio 2019 build, create a new environment file, for example %USERPROFILE%/src/env-cc3d-2026.yaml, with the following content:
name: cc3d-compile-2026
channels:
  - conda-forge
  - compucell3d
dependencies:
  - _python_abi3_support=1.0=hd8ed1ab_2
  - aiohappyeyeballs=2.6.1=pyhd8ed1ab_0
  - aiohttp=3.13.5=py312h6b91d65_0
  - aiosignal=1.4.0=pyhd8ed1ab_0
  - alabaster=1.0.0=pyhd8ed1ab_1
  - annotated-doc=0.0.4=pyhcf101f3_0
  - anyio=4.13.0=pyhcf101f3_0
  - aom=3.9.1=he0c23c2_0
  - argon2-cffi=25.1.0=pyhd8ed1ab_0
  - argon2-cffi-bindings=25.1.0=py312he06e257_2
  - arrow=1.4.0=pyhcf101f3_0
  - asttokens=3.0.1=pyhd8ed1ab_0
  - async-lru=2.3.0=pyhcf101f3_0
  - attrs=26.1.0=pyhcf101f3_0
  - babel=2.18.0=pyhcf101f3_1
  - backports.zstd=1.3.0=py312h06d0912_0
  - beautifulsoup4=4.14.3=pyha770c72_0
  - bleach=6.3.0=pyhcf101f3_1
  - bleach-with-css=6.3.0=hbca2aae_1
  - blosc=1.21.6=h85f69ea_0
  - boost=1.85.0=h7e22eef_4
  - brotli=1.2.0=h2d644bc_1
  - brotli-bin=1.2.0=hfd05255_1
  - brotli-python=1.2.0=py312hc6d9e41_1
  - bzip2=1.0.8=h0ad9c76_9
  - ca-certificates=2026.4.22=h4c7d964_0
  - cached-property=1.5.2=hd8ed1ab_1
  - cached_property=1.5.2=pyha770c72_1
  - cairo=1.18.0=h91e5215_2
  - cc3d-network-solvers=0.3.1=py312h1d48e73_2
  - cc3dext_maboss=0.3.0=py312h0a80cce_1
  - certifi=2026.4.22=pyhd8ed1ab_0
  - cffi=2.0.0=py312he06e257_1
  - chardet=7.4.3=pyhcf101f3_0
  - charset-normalizer=3.4.7=pyhd8ed1ab_0
  - click=8.3.2=pyh6dadd2b_0
  - cmake=4.2.3=hdcbee5b_1
  - colorama=0.4.6=pyhd8ed1ab_1
  - comm=0.2.3=pyhe01879c_0
  - contourpy=1.3.3=py312h78d62e6_4
  - cpython=3.12.13=py312hd8ed1ab_0
  - cycler=0.12.1=pyhcf101f3_2
  - dav1d=1.2.1=hcfcfb64_0
  - debugpy=1.8.20=py312ha1a9051_0
  - decorator=5.2.1=pyhd8ed1ab_0
  - defusedxml=0.7.1=pyhd8ed1ab_0
  - deprecated=1.3.1=pyhd8ed1ab_1
  - docutils=0.22.4=pyhd8ed1ab_0
  - double-conversion=3.3.1=he0c23c2_0
  - eigen=3.4.0=h5112557_2
  - exceptiongroup=1.3.1=pyhd8ed1ab_0
  - executing=2.2.1=pyhd8ed1ab_0
  - expat=2.7.5=hac47afa_0
  - ffmpeg=6.1.2=gpl_h9673905_705
  - fipy=4.0.2=pyhd8ed1ab_0
  - font-ttf-dejavu-sans-mono=2.37=hab24e00_0
  - font-ttf-inconsolata=3.000=h77eed37_0
  - font-ttf-source-code-pro=2.038=h77eed37_0
  - font-ttf-ubuntu=0.83=h77eed37_3
  - fontconfig=2.14.2=hbde0cde_0
  - fonts-conda-ecosystem=1=0
  - fonts-conda-forge=1=hc364b38_1
  - fonttools=4.62.1=py312h05f76fc_0
  - fqdn=1.5.1=pyhd8ed1ab_1
  - freetype=2.14.3=h57928b3_0
  - fribidi=1.0.16=hfd05255_0
  - frozenlist=1.7.0=py312hfdf67e6_0
  - getopt-win32=0.1=h6a83c73_3
  - gl2ps=1.4.2=h26c196c_2
  - glew=2.1.0=h39d44d4_2
  - glib=2.80.2=h0df6a38_0
  - glib-tools=2.80.2=h2f9d560_0
  - graphite2=1.3.14=hac47afa_2
  - graphviz=9.0.0=h51cb2cd_1
  - gst-plugins-base=1.24.5=hb0a98b8_0
  - gstreamer=1.24.5=h5006eae_0
  - gts=0.7.6=h6b5321d_4
  - h11=0.16.0=pyhcf101f3_1
  - h2=4.3.0=pyhcf101f3_0
  - harfbuzz=9.0.0=h81778c3_0
  - hdf4=4.2.15=h5557f11_7
  - hdf5=1.14.3=nompi_hb2c4d47_109
  - hpack=4.1.0=pyhd8ed1ab_0
  - httpcore=1.0.9=pyh29332c3_0
  - httpx=0.28.1=pyhd8ed1ab_0
  - hyperframe=6.1.0=pyhd8ed1ab_0
  - icu=73.2=h63175ca_0
  - idna=3.13=pyhcf101f3_0
  - imagesize=2.0.0=pyhd8ed1ab_0
  - importlib-metadata=8.8.0=pyhcf101f3_0
  - importlib_resources=7.1.0=pyhd8ed1ab_0
  - ipycanvas=0.14.3=pyhcf101f3_0
  - ipyevents=2.0.4=pyhbbac1ac_0
  - ipykernel=7.2.0=pyh6dadd2b_1
  - ipython=9.13.0=pyhe2676ad_0
  - ipython_genutils=0.2.0=pyhd8ed1ab_2
  - ipython_pygments_lexers=1.1.1=pyhd8ed1ab_0
  - ipyvtklink=0.2.3=pyhd8ed1ab_0
  - ipywidgets=7.8.5=pyhd8ed1ab_0
  - isoduration=20.11.0=pyhd8ed1ab_1
  - jedi=0.19.2=pyhd8ed1ab_1
  - jinja2=3.1.6=pyhcf101f3_1
  - json5=0.14.0=pyhd8ed1ab_0
  - jsoncpp=1.9.5=h2d74725_1
  - jsonpointer=3.1.1=pyhcf101f3_0
  - jsonschema=4.26.0=pyhcf101f3_0
  - jsonschema-specifications=2025.9.1=pyhcf101f3_0
  - jsonschema-with-format-nongpl=4.26.0=hcf101f3_0
  - jupyter-lsp=2.3.1=pyhcf101f3_0
  - jupyter_client=8.8.0=pyhcf101f3_0
  - jupyter_core=5.9.1=pyh6dadd2b_0
  - jupyter_events=0.12.1=pyhcf101f3_0
  - jupyter_server=2.17.0=pyhcf101f3_0
  - jupyter_server_terminals=0.5.4=pyhcf101f3_0
  - jupyterlab=4.5.6=pyhd8ed1ab_0
  - jupyterlab_pygments=0.3.0=pyhd8ed1ab_2
  - jupyterlab_server=2.28.0=pyhcf101f3_0
  - jupyterlab_widgets=1.1.11=pyhd8ed1ab_0
  - kiwisolver=1.5.0=py312h78d62e6_0
  - krb5=1.21.3=hdf4eb48_0
  - lark=1.3.1=pyhd8ed1ab_0
  - lcms2=2.18=hf2c6c5f_0
  - lerc=4.1.0=hd936e49_0
  - libaec=1.1.5=haf901d7_0
  - libblas=3.9.0=35_h5709861_mkl
  - libboost=1.85.0=h444863b_4
  - libboost-devel=1.85.0=h91493d7_4
  - libboost-headers=1.85.0=h57928b3_4
  - libboost-python=1.85.0=py312hbaa7e33_4
  - libboost-python-devel=1.85.0=py312h7e22eef_4
  - libbrotlicommon=1.2.0=hfd05255_1
  - libbrotlidec=1.2.0=hfd05255_1
  - libbrotlienc=1.2.0=hfd05255_1
  - libcblas=3.9.0=35_h2a3cdd5_mkl
  - libclang13=22.1.4=default_ha2db4b5_0
  - libcurl=8.18.0=h43ecb02_0
  - libdeflate=1.25=h51727cc_0
  - libexpat=2.7.5=hac47afa_0
  - libffi=3.5.2=h3d046cb_0
  - libfreetype=2.14.3=h57928b3_0
  - libfreetype6=2.14.3=hdbac1cb_0
  - libgd=2.3.3=h312136b_9
  - libglib=2.80.2=h0df6a38_0
  - libhwloc=2.11.2=default_hc8275d1_1000
  - libiconv=1.18=hc1393d2_2
  - libintl=0.22.5=h5728263_3
  - libintl-devel=0.22.5=h5728263_3
  - libjpeg-turbo=3.1.4.1=hfd05255_0
  - liblapack=3.9.0=35_hf9ab0e9_mkl
  - liblzma=5.8.3=hfd05255_0
  - liblzma-devel=5.8.3=hfd05255_0
  - libnetcdf=4.9.2=nompi_h008f77d_116
  - libogg=1.3.5=h2466b09_1
  - libopus=1.6.1=h6a83c73_0
  - libpng=1.6.58=h7351971_0
  - libsodium=1.0.20=hc70643c_0
  - libsqlite=3.53.0=hf5d6505_0
  - libssh2=1.11.1=h9aa295b_0
  - libtheora=1.1.1=hc70643c_1006
  - libtiff=4.7.1=h8f73337_1
  - libuv=1.51.0=hfd05255_1
  - libvorbis=1.3.7=h5112557_2
  - libwebp=1.6.0=h4d5522a_0
  - libwebp-base=1.6.0=h4d5522a_0
  - libxcb=1.16=h013a479_1
  - libxml2=2.13.9=h741aa76_0
  - libxslt=1.1.43=h25c3957_0
  - libzip=1.11.2=h3135430_0
  - libzlib=1.3.2=hfd05255_2
  - llvm-openmp=22.1.4=h4fa8253_0
  - loguru=0.7.3=pyh7428d3b_0
  - lxml=6.0.2=py312hc85b015_0
  - lz4-c=1.9.4=hcfcfb64_0
  - m2w64-dlfcn=1.1.1=1
  - m2w64-gcc-libgfortran=5.3.0=6
  - m2w64-gcc-libs=5.3.0=7
  - m2w64-gcc-libs-core=5.3.0=7
  - m2w64-gmp=6.1.0=2
  - m2w64-libwinpthread-git=5.0.0.4634.697f757=2
  - markdown-it-py=4.0.0=pyhd8ed1ab_0
  - markupsafe=3.0.3=py312h05f76fc_1
  - matplotlib-base=3.10.9=py312h0ebf65c_0
  - matplotlib-inline=0.2.1=pyhd8ed1ab_0
  - mdurl=0.1.2=pyhd8ed1ab_1
  - mistune=3.2.0=pyhcf101f3_0
  - mkl=2024.2.2=h57928b3_16
  - msgpack-python=1.1.2=py312hf90b1b7_1
  - msys2-conda-epoch=20160418=1
  - multidict=6.7.1=py312h05f76fc_0
  - munkres=1.1.4=pyhd8ed1ab_1
  - nbclient=0.10.4=pyhd8ed1ab_0
  - nbconvert-core=7.17.1=pyhcf101f3_0
  - nbformat=5.10.4=pyhd8ed1ab_1
  - nest-asyncio=1.6.0=pyhd8ed1ab_1
  - nlohmann_json=3.12.0=h5112557_1
  - notebook=7.5.5=pyhcf101f3_0
  - notebook-shim=0.2.4=pyhd8ed1ab_1
  - numpy=2.2.6=py312h3150e54_0
  - openh264=2.4.1=h63175ca_0
  - openjpeg=2.5.4=h0e57b4f_0
  - openssl=3.6.2=hf411b9b_0
  - overrides=7.7.0=pyhd8ed1ab_1
  - packaging=26.1=pyhc364b38_0
  - pandas=3.0.2=py312h95189c4_0
  - pandocfilters=1.5.0=pyhd8ed1ab_0
  - pango=1.54.0=hbb871f6_1
  - parso=0.8.6=pyhcf101f3_0
  - pcre2=10.43=h17e33f8_0
  - pillow=10.4.0=py312h381445a_1
  - pip=26.0.1=pyh8b19718_0
  - pixman=0.46.4=h5112557_1
  - platformdirs=4.9.6=pyhcf101f3_0
  - ply=3.11=pyhd8ed1ab_3
  - proj=9.3.1=he13c7e8_0
  - prometheus_client=0.25.0=pyhd8ed1ab_0
  - prompt-toolkit=3.0.52=pyha770c72_0
  - propcache=0.3.1=py312h31fea79_0
  - psutil=7.2.2=py312he5662c2_0
  - pthread-stubs=0.4=hcd874cb_1001
  - pthreads-win32=2.9.1=h2466b09_4
  - pugixml=1.14=h63175ca_0
  - pure_eval=0.2.3=pyhd8ed1ab_1
  - pycparser=2.22=pyh29332c3_1
  - pygments=2.20.0=pyhd8ed1ab_0
  - pyparsing=3.3.2=pyhcf101f3_0
  - pyqt=5.15.9=py312he09f080_5
  - pyqt5-sip=12.12.2=py312h53d5487_5
  - pyqtgraph=0.14.0=pyhd8ed1ab_0
  - pyqtwebkit=5.15.9=py312hca0710b_2
  - pysocks=1.7.1=pyh09c184e_7
  - python=3.12.2=h2628c8c_0_cpython
  - python-dateutil=2.9.0.post0=pyhe01879c_2
  - python-fastjsonschema=2.21.2=pyhe01879c_0
  - python-gil=3.12.13=hd8ed1ab_0
  - python-json-logger=2.0.7=pyhd8ed1ab_0
  - python-tzdata=2026.2=pyhd8ed1ab_0
  - python_abi=3.12=8_cp312
  - pywin32=311=py312h829343e_1
  - pywinpty=2.0.15=py312h275cf98_1
  - pyyaml=6.0.3=py312h05f76fc_1
  - pyzmq=27.1.0=py312h343a6d4_2
  - qhull=2020.2=hc790b64_5
  - qscintilla2=2.14.1=py312hca0710b_0
  - qt-main=5.15.8=h06adc49_22
  - qt6-main=6.7.2=h913a85e_3
  - qtwebkit=5.212=h4d8ddc9_16
  - referencing=0.37.0=pyhcf101f3_0
  - requests=2.33.1=pyhcf101f3_1
  - rfc3339-validator=0.1.4=pyhd8ed1ab_1
  - rfc3986-validator=0.1.1=pyh9f0ad1d_0
  - rfc3987-syntax=1.1.0=pyhe01879c_1
  - rich=15.0.0=pyhcf101f3_0
  - roman-numerals=4.1.0=pyhd8ed1ab_0
  - rpds-py=0.30.0=py312hdabe01f_0
  - send2trash=2.1.0=pyh6dadd2b_1
  - setuptools=82.0.1=pyh332efcf_0
  - shellingham=1.5.4=pyhd8ed1ab_2
  - simservice=0.1.1=pyhd8ed1ab_0
  - sip=6.7.12=py312h53d5487_0
  - six=1.17.0=pyhe01879c_1
  - snappy=1.2.2=h7fa0ca8_1
  - sniffio=1.3.1=pyhd8ed1ab_2
  - snowballstemmer=3.0.1=pyhd8ed1ab_0
  - soupsieve=2.8.3=pyhd8ed1ab_0
  - sphinx=9.1.0=pyhd8ed1ab_0
  - sphinxcontrib-applehelp=2.0.0=pyhd8ed1ab_1
  - sphinxcontrib-devhelp=2.0.0=pyhd8ed1ab_1
  - sphinxcontrib-htmlhelp=2.1.0=pyhd8ed1ab_1
  - sphinxcontrib-jsmath=1.0.1=pyhd8ed1ab_1
  - sphinxcontrib-qthelp=2.0.0=pyhd8ed1ab_1
  - sphinxcontrib-serializinghtml=1.1.10=pyhd8ed1ab_1
  - sqlite=3.53.0=hdb435a2_0
  - stack_data=0.6.3=pyhd8ed1ab_1
  - svt-av1=2.2.1=he0c23c2_0
  - swig=4.2.1=hb8d0685_0
  - tbb=2021.13.0=h62715c5_1
  - tbb-devel=2021.13.0=h47441b3_1
  - terminado=0.18.1=pyh6dadd2b_1
  - tinycss2=1.4.0=pyhd8ed1ab_0
  - tk=8.6.13=h6ed50ae_3
  - toml=0.10.2=pyhcf101f3_3
  - tomli=2.4.1=pyhcf101f3_0
  - tornado=6.5.5=py312he06e257_0
  - traitlets=5.14.3=pyhd8ed1ab_1
  - typer=0.24.2=pyhcf101f3_0
  - typing-extensions=4.15.0=h396c80c_0
  - typing_extensions=4.15.0=pyhcf101f3_0
  - typing_utils=0.1.0=pyhd8ed1ab_1
  - tzdata=2025c=hc9c84f9_1
  - ucrt=10.0.26100.0=h57928b3_0
  - unicodedata2=17.0.1=py312he06e257_0
  - uri-template=1.3.0=pyhd8ed1ab_1
  - urllib3=2.6.3=pyhd8ed1ab_0
  - utfcpp=4.09=h57928b3_0
  - vc=14.3=h41ae7f8_34
  - vc14_runtime=14.44.35208=h818238b_34
  - vcomp14=14.44.35208=h818238b_34
  - vs2015_runtime=14.44.35208=h38c0c73_34
  - vtk=9.3.1=qt_py312h31e1f40_201
  - vtk-base=9.3.1=qt_py312h0ad9dcb_201
  - wcwidth=0.6.0=pyhd8ed1ab_0
  - webcolors=25.10.0=pyhd8ed1ab_0
  - webencodings=0.5.1=pyhd8ed1ab_3
  - websocket-client=1.9.0=pyhd8ed1ab_0
  - wheel=0.47.0=pyhd8ed1ab_0
  - widgetsnbextension=3.6.10=pyhd8ed1ab_0
  - win32_setctime=1.2.0=pyhd8ed1ab_0
  - win_inet_pton=1.1.0=pyh7428d3b_8
  - winpty=0.4.3=4
  - wrapt=2.1.2=py312he06e257_0
  - wslink=2.5.6=pyhd8ed1ab_0
  - x264=1!164.3095=h8ffe710_2
  - x265=3.5=h2d74725_3
  - xorg-kbproto=1.0.7=hcd874cb_1002
  - xorg-libice=1.1.1=hcd874cb_0
  - xorg-libsm=1.2.4=hcd874cb_0
  - xorg-libx11=1.8.9=h0076a8d_1
  - xorg-libxau=1.0.11=hcd874cb_0
  - xorg-libxdmcp=1.1.3=hcd874cb_0
  - xorg-libxext=1.3.4=hcd874cb_2
  - xorg-libxpm=3.5.17=hcd874cb_0
  - xorg-libxt=1.3.0=hcd874cb_1
  - xorg-xextproto=7.3.0=hcd874cb_1003
  - xorg-xproto=7.0.31=hcd874cb_1007
  - xz=5.8.3=hb6c8415_0
  - xz-tools=5.8.3=hfd05255_0
  - yaml=0.2.5=h6a83c73_3
  - yarl=1.23.0=py312h05f76fc_0
  - zeromq=4.3.5=h5bddc39_9
  - zipp=3.23.1=pyhcf101f3_0
  - zlib=1.3.2=hfd05255_2
  - zstd=1.5.7=h534d264_6
  - pip:
      - scipy==1.17.1
Create the environment using:
cd %USERPROFILE%/src
mamba env create -f %USERPROFILE%/src/env-cc3d-2026.yaml
and activate it:
conda activate cc3d-compile-2026
Once the environment is active, configure the build with CMake:
cmake -S %USERPROFILE%/src/CompuCell3D/CompuCell3D -B %USERPROFILE%/src/CompuCell3D_build -DPython3_EXECUTABLE=%CONDA_PREFIX%\python.exe -DNO_OPENCL=ON -DBUILD_STANDALONE=OFF -G "Visual Studio 18 2026" -A x64 -DCMAKE_INSTALL_PREFIX=%USERPROFILE%/install_projects/cc3d-compile-2026
Compared to the Visual Studio 2019 setup, the important differences are the environment name cc3d-compile-2026, the use of %CONDA_PREFIX%\python.exe to point to the active conda environment, the Visual Studio 18 2026 generator, and the explicit -A x64 flag.
If you need a reusable template, use:
cmake -S <PATH TO CompuCell3D REPO>\CompuCell3D -B <dir to store build files> -DPython3_EXECUTABLE=%CONDA_PREFIX%\python.exe -DNO_OPENCL=ON -DBUILD_STANDALONE=OFF -G "Visual Studio 18 2026" -A x64 -DCMAKE_INSTALL_PREFIX=<dir where compiled CompuCell3D will be written to>
After configuration finishes, open the generated solution in Visual Studio 2026, build ALL_BUILD using the Release configuration, and then build INSTALL exactly as described earlier for the Visual Studio 2015/2019 workflow.